Upgrading cocos2d-iphone is a recurring issue for many developers but since it happens so infrequently during the lifecycle of a project, there’s just no routine to follow. Eventually you might want to upgrade cocos2d-iphone, so the question arises: how do you do that with the least amount of trouble?
As I’m going through the process of updating over 70 (!) Xcode projects for the second revision of my Learn Cocos2D book, I thought I should outline the steps to upgrade an existing Xcode 3 project which uses cocos2d-iphone v0.99.x to a Xcode 4 project that uses cocos2d-iphone v1.0.x.
Prerequisites: software update
Obviously, you want to download the latest cocos2d-iphone version and unzip it to any directory. Just remember where you unzipped it because that’s where you’ll copy the new library folders from.
You also want to make sure you’ve upgraded to Xcode 4 by now, by installing the iOS 4.3 (or later) SDK, if you haven’t done so already.
Caution: Make sure Xcode is closed during the first steps.
Step #1: delete libs folder contents
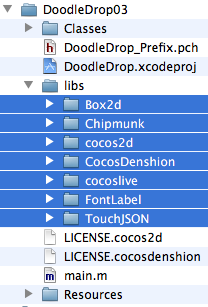
In your project’s folder, in this case DoodleDrop03, select all folders in the libs folder and delete them without mercy:
You’ll end up with an empty libs folder. In other words, don’t delete the libs folder itself or in case you did, make sure you re-create the libs folder.
Caution: The reason why I delete all the libraries in the libs folder instead of simply overwriting the libraries with new ones is simple: you can expect the updated cocos2d-iphone version to have removed or renamed some files. By first deleting all libraries you can be sure that no “zombie files” exist which are no longer used but might still be compiled when you later re-add the libraries. Such zombie files would screw up the build process and generate errors like “Duplicate defined symbols” and other such mishaps.
Step #2: copy the library folders
The first thing you’ll notice when you want to upgrade the libs (Box2D, Chipmunk, cocos2d, CocosDenshion, cocoslive, FontLabel and TouchJSON) is that they’re in different folders in the cocos2d-iphone project that you’ve downloaded and unzipped.
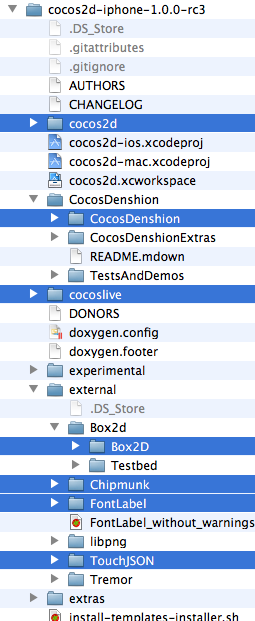
Make sure you select the exact same folders that are selected in the screenshot below:
This difference in folder layout can be a bit confusing. What you need to be aware of is that the Box2D, Chipmunk, FontLabel and TouchJSON folders are in the external folder in the cocos2d-iphone project. Furthermore, the Box2D folder that you should copy is a subfolder of Box2d. Note the difference in capitalization of the letter D. You want to copy the folder with the uppercase D: Box2D. The same goes for the CocosDenshion folder, you should select the CocosDenshion folder inside the CocosDenshion folder.
Caution: Make sure you don’t select the Box2D Testbed folder - if you do and copy that as well, Xcode 4 might lock up building the project, consuming 100% CPU power and requiring a force quit to shut it down.
Note: If you use only Chipmunk or Box2D physics, or neither of them, you can skip copying these folders of course.
To complete the copy opertation, go to the libs folder and paste the copied library folders so that you end up with a libs folder that looks exactly like the image in Step #1.
Tip: If you prefer drag and drop you can just drag the selected folders from one Finder window to another onto your project’s libs folder. This may be easier to do but you should remember to hold down the Option key while dropping so that you actually copy the folders instead of moving them. The copy operation is indicated by the green + icon underneath the cursor as you drag & drop while holding the Option key.
Step #3: Remove Library References
Open your project in Xcode 4 now.
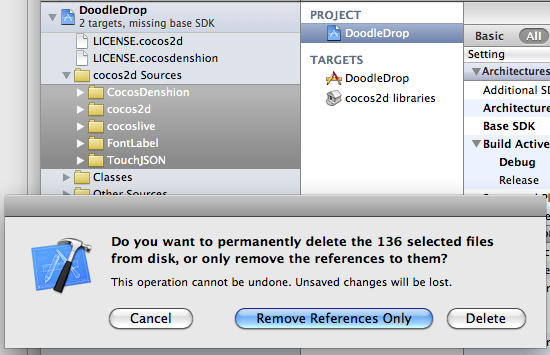
Select all groups under the cocos2d Sources group and hit Backspace to delete these groups (or right-click and choose Delete). You will be prompted with a dialog like in the screenshot below.
Make sure you select the default option Remove References Only to avoid deleting the new library folders you just copied:
Once you’ve removed the libraries groups, the cocos2d Sources group should be completely empty. You just got rid of all the old references, saving yourself from any potential compilation errors caused by references to files which may not exist anymore.
Step #4: Add Library Folders
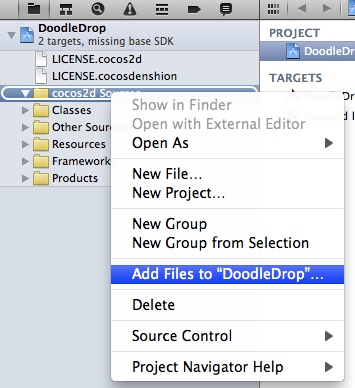
Next you want to re-add your library folders. Select and right click the cocos2d Sources group and select Add Files to “NameOfYourProject”…:
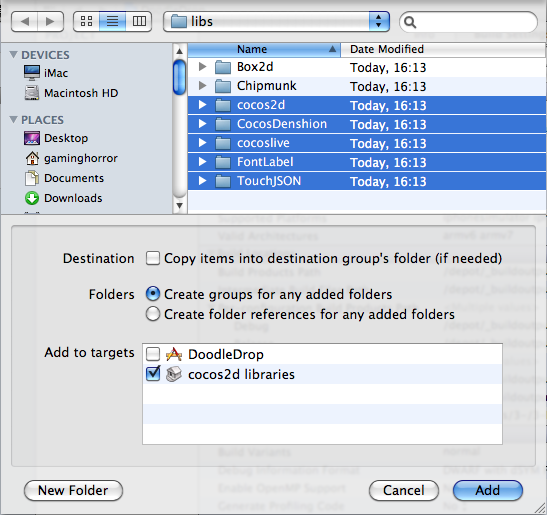
Browse into the project’s libs folder and select all the library folders that you need in your project.
You may have noticed that my project doesn’t use any physics engine, so I decided to not add them here. If you do use Box2D in your project you would want to also select Box2D of course. Likewise if you use Chipmunk.
Note: While it’s not a problem to add both physics engine folders, doing so might increase your App’s size.
Now, here’s where you need to be careful with the options! You want to make sure they’re set exactly as in the screenshot below. Most importantly, when adding files Xcode will default to add the files to the project’s main target (in this case DoodleDrop) instead of the cocos2d libraries target.
Make sure that only the cocos2d libraries target is selected to avoid any build errors:
Step #5: Build it!
You should now try and build the project. If you’re lucky, there won’t be any errors and you can continue with your work.
But most likely, depending on your project’s complexity and the changes made to cocos2d-iphone, you may have to fix any build errors that occur. Most of them are likely to be caused by classes that have been renamed or functions that have been deprecated. In this case you’ll have to find out through the API Reference and release notes what the changes are and how to fix them.
Fixing the “missing base SDK” message
One common issue that occurs specifically to older projects is the “missing base SDK” error. I think it was the Xcode version introduced with Mac OS X Snow Leopard (released Aug. 28th 2010) that eventually fixed this dreaded issue by adding a “latest iOS” option for the Base SDK Build Setting.
If you see a message like this (especially if it gives you a compile warning or error):
![]()
You should change the Base SDK Build Setting of your project to use the “Latest iOS” setting:
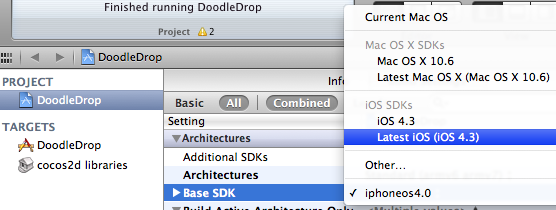
Note: In some cases it may be necessary to close Xcode 4 and re-open it to make the “missing base SDK” message go away.
Correctly Inheriting Build Settings
Normally, all targets in Xcode inherit the Build Settings of the project by default.
However, once you’ve made any change to any Build Setting at the target level this Build Setting will no longer inherit changes made to the same Build Setting on the project level. The default reaction by many developers is often to bite the bullet and check and re-check the Build Settings of the project as well as all targets, and to make the same change as many times as you have targets in your project.
Don’t do that, there’s a better and easier way!
You can have a Build Setting at the target level to default back to inherit the Build Setting defined at the project level. Likewise a Build Setting at the project level can be set to inherit from the OS default setting. In the screenshot below I have purposefully changed the Build Setting at the target level:
![]()
To have it default back to the project setting, which is Latest iOS (iOS 4.3) all you need to do is to select that Build Setting and hit the Delete key:
![]()
Tip: Switching from the Combined to the Levels view when reviewing the Build Settings makes it easy to see which Build Settings are inherited and which aren’t. You’ll also notice that any Build Setting that has been changed at the current level and doesn’t inherit its value anymore is printed in bold letters.
That’s it!
Happy coding with your newly updated cocos2d-iphone project! This upgrade tutorial will also be printed in the second revision of the Learn Cocos2D book.
Tip: With Kobold2D it will be even easier to upgrade your project because a simple copy & paste of the files in the kobold2d folder will suffice. If there are ever any additional steps to follow we’ll describe them in detail of course.
| Follow @gaminghorror | Follow @kobold2d |
|






[…] also recently wrote a tutorial outlining the steps to update an existing cocos2d-iphone v0.99.x project to v1.0 in case you have an existing project that you’d like to upgrade to the latest Cocos2D […]
There’s a small issue with the tutorial. If you add all of the CocosDenshion high level folder, you’ll end up with a “duplicate symbol _main” issue. You should use the lower level CocosDenshion folder (ie. cocos2d-iphone-1.0.0-rc3/CocosDenshion/CocosDenshion ).
That’s true, thanks I’ll fix it.
Hi Steffen,
I bought your book a few days ago and I’m learning so much from it! Thanks for your great work.
My question is: how do I use my old code from COCOS2D_VERSION 0x00000800 to cocos2d-iphone v1.0.x?
Cocos2D classes names have changed a lot. Is there a way to integrate both versions or do I have to change all my working code from the old version with the new classes from cocos2d-iphone v1.0.x?
Thanks for your attention!
Phillip
I’m afraid there’s no easy way. You will have to do two things, and I recommend to do them in that order:
1) find the cocos2d classes that have been renamed, and change the class names one-by-one in your code (e.g. rename CCLabel to CCLabelTTF)
2) fix any errors along the lines of “deprecated function” or “may not respond to”. These may be methods of cocos2d classes that have been renamed or replaced. Use the release notes and API reference as your guide to find out which alternate versions you should call. If in doubt, comment out that code for now until you get a clean build.
3) fix any remaining build errors
Tip: you’ll get possibly hundreds, if not thousands or errors logged. However it’s usually not as dramatic as it looks on first sight, since frequently one error causes dozens of other follow-up errors. So fixing a couple class names can already reduce the number of reported errors significantly.
[…] A couple months ago I wrote a tutorial explaining how to upgrade Cocos2D in an existing project. […]
Thanks Steffen, this saved me a lot of time! I would remind Box2D users that are upgrading to XCode 4.2 to also replace GLES-Render.h and GLES-Render.mm or else they might get this error…
“Variable length of array of non-POD element type b2Vec2”
Great book too, highly recommend it!
Justin, you are the Best!
Exactly the problem that I had with my project!
If you have the Variable length of array of non-POD element type b2Vec2 problem, GLES-Render is probably faulty.
Thanx again!
Confused a bit.
Existing project is DoodleDrop03 or DoodleDrop?
DoodleDrop03 has lib folder, DoodleDrop has cocos2D sources folder.
???????
DoodleDrop is the name of the project, DoodleDrop03 is the folder name where the project resides in.
The DoodleDrop03 folder (in Finder) has a libs subfolder. The DoodleDrop project (in Xcode) has a cocos2d Sources group which contains various files from the libs subfolder. Groups in Xcode are not the same as folders.
Will this work going from cocos2d 1.0x to cocs2d 2.0x…..
I have been putting on doing this.. but now my project demands it.
Thanks for the tutorial! — And man, I don’t want to do this. LOL
It’ll work, but it won’t spare you the trouble of updating your code to use cocos2d 2.0. Most changes are straightforward though, mostly different method or class names.
Will this work going from cocos2d 1.0x to cocs2d 2.0x…..
I have been putting on doing this.. but now my project demands it.
Thanks for the tutorial! — And man, I don’t want to do this. LOL
Thank You so much for this wonderful blog article. Between you and Ray Wanderlich, I was able to create a wonderful word game from scratch….
I hope one day to be able to repay the kindness, with articles of my own.
Hi Steffen, thanks for this handy post. I also came across this article:
http://www.clintharris.net/2009/iphone-app-shared-libraries/
Do you have any experience with that approach?
That article is way outdated but the general idea is sound. In fact it’s similar to how Kobold2D is set up. That article inspired me back in late 2009 to create “cocos2d-project” just to be able to share cocos2d between projects and update it more easily. Over time, Kobold2D evolved from that.
I wouldn’t recommend following the article’s instructions since Xcode 4 makes a number of these steps easier or unnecessary, and I’m guessing some of it just won’t work anymore.
Ok, good to know!
Hey Steffen, I was following this and I get Duplicate interface definition issues inside CCGLView.h. Version upgrade to 2.1. Any idea how to remove that ? Should I just delete that file?
Make sure there aren’t any duplicates of the file. If in doubt start the process over again. There is of course always the possibility that the newer cocos2d version won’t initially compile with the xcode version you’re using.
I missed one step. I didn’t close xcode at the beginning. I got it working. Thanks.
[…] trivial. Similar process as before but expect a host of problems due to massive changes to the cocos2d API. The larger the project […]