The Kobold2D Website is now online. Go, have a look and let me know what you think.
Here are some pointers to get you started about Kobold2D (in case you haven’t heard) and the Kobold2D website:
- Kobold2D has an installer that gets you started in no time
- Kobold2D has 8 (soon: 12+) exciting template projects to get started with
- Kobold2D provides all the libraries you’ll need: Cocos2D, Cocos3D, Wax, Lua, iSimulate, ObjectAL, Chipmunk SpaceManager, SneakyInput and more
- Kobold2D has all the documentation: online & offline HTML, Xcode Help
- Kobold2D answers your frequently asked questions …
- Kobold2D helps you move your Cocos2D Projects over …
The Ultimate Cocos2D Project is: Kobold2D!
Put simply: Kobold2D is designed to make Cocos2D developers more productive.
Original Post
Last week I wrote that I’m Building The Ultimate Cocos2D Xcode Project. In today’s weekly update I wanted to give you some more details on the use of libraries in that project.
Cocos3D included
So there happens to be a Cocos3D now. Rather than being part of the Cocos2D distribution, it’s an extension project. Guess what that means? Right, installing Cocos3D means fumbling with the dreaded install-templates.sh script (see this Cocos3D tutorial). Of course the first user reactions were: how do I install it? Installation failed, what am I doing wrong? And so on …
The Ultimate Cocos2D Project wouldn’t be ultimate if it didn’t include Cocos3D out of the box. And unmodified of course, as with all included libraries I want to make it as simple as possible to replace one library version with another. Once you get to half a dozen of included libraries, maintaining them all can become a hassle, so the very least I can do is to make it easy for everyone to upgrade specific libraries.
Obviously: Cocos2D included
Of course Cocos2D is also included as a static library as opposed to cluttering your project with all of its source files. Xcode project references make it very convenient to add external code and keeping it seperate. I’ve described the process in detail in my Cocos2D Xcode Project tutorial but since then I’ve learned a couple more things about how to make this even better.
For example, I no longer include cocos2d-iphone directly, instead there’s a seperate Xcode project in between so that I have full control over build settings (using XCConfig files) and make it possible to build both iOS and Mac OS targets in the same Xcode project. I will also include the current version of Cocos2D in the download because my goal is to make everything work out of the box.
No fumbling with install scripts, no additional downloads necessary, no need to modify any Xcode build settings - including developer certificates and header search paths. Build configurations for Ad Hoc and App Store release builds are also included, which will create .IPA and .ZIP files for you ready for Ad Hoc distribution respectively upload on iTunes Connect.
Popular libraries included
Now let’s get to the juicy part. Early on I realized that Cocos2D users often needed (or wanted) to include other libraries. Some of them have become so popular among the Cocos2D crowd that they could as well be part of the official distribution. Alas, they’re not. That’s a service I want to provide.
Often those libraries require special and non-obvious steps to successfully add them to an existing project. All too often those steps are either undocumented, untested, hard to follow, refer to outdated versions of Xcode, iOS SDK, etc. and generally require technical expertise of project configuration and compiler settings.
This is all taken care of for you. Here’s the list of libraries that are already included in the Ultimate Cocos2D Xcode Project:
- Cocos2D (iOS & Mac OS in the same project)
- Cocos3D (ready to use of course)
- Wax & Lua (Wax is enabled and setup, essential Lua functions have an ObjC interface)
- ObjectAL - “iOS Audio, minus the headache” (has excellent documentation!)
- iSimulate - lib included with permission, requires separate iSimulate Lite App or full version
- Cocos2D Gems: GameKitHelper, ClippingNode, Multiple Update Selectors, FrameOrFile, more…
- iAd (already setup in RootViewController, just enable it)
- Chipmunk SpaceManager (ObjC interface for Chipmunk physics)
- SneakyInput (or alternative Joypad library if there is one)
- Objective-C Optimized Singleton Macro (gets rid of @synchronized to improve speed)
- LOG_EXPR (logs any statement, no format strings needed: LOG_EXPR([self contentSize]) )
- … did I miss an essential library? Please leave a comment!
That is quite a list. All you need to do to use these libraries is to either enable them in code or merely include the header file and start using them. If you worry that all these libraries will bloat your App, rest assured that Xcode is very clever: if you don’t actually make use of a static library (eg don’t include any of its header files), it will not be linked with your App and not waste any space or performance. I verified that.
Update policy
These are a lot of libraries to keep up to date. I plan to make about 4-8 point releases each year, usually triggered by a major (speak: non-beta) release of Cocos2D. If updating other libraries justifies an update depends on the library’s importance and the significance of the update.
Your libraries
Adding your own libraries to the project will be easy and the process will be documented. This will encourage code-sharing because your library will just work with other user’s project, it only needs to follow a few simple guidelines to become plugin-capable. This opens the door for better and tighter integration of 3rd party code into your projects. Even if you don’t intend to share your code, you’ll still benefit because your code will be easier to re-use and maintain.
Also, if you like you can make a request for a specific library or additional source code that should be included in the project, please leave a comment. I’ll see what I can do. 
Linkvent Calendar, Day 14: Box2D Top-Down Car Demo
Jeff Hodnett has ported a popular Flash ActionScript Box2D Car demo to Cocos2D:
The car uses two revolute joints for turning the car and two prismatic joints to add driving force (torque?) to the car. The Xcode project is available for download and the virtual thumbstick controlling the car is provided by the popular SneakyInput library.
Chapter 8 - Shoot ’em Up
This chapter will finish the shoot ’em up game. There will be enemies and powerups. It raises the issue of good code design when certain things like shooting and moving are common to all objects while other things such as what to shoot and where from and to depend on who is shooting. And then to determine who is hit by whose bullets.
Of course no shoot ’em up game is complete with a boss monster that takes a couple hits to kill. So it’ll need a healthbar. At the end of the chapter this shoot’ em up should be a fully playable game, with Chapter 9 complementing it with visual effects by using the cocos2d particle system. But I’m getting ahead of myself here.
Summary of working on Chapter 7 - Scrolling With Joy
Once again I renamed the chapter a bit since it’s divided into two parts: a parallax, infinitely scrolling background and input via SneakyInput, featuring a fire button and an analog thumbstick respectively at the end changed to a 8-way digital pad.
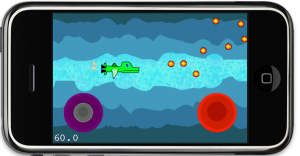 The parallax scrolling background consists of several bands or stripes which were created on different layers each in Seashore and then saved as individual 480×320 images. They were then added to the Texture Atlas by Zwoptex. The cool thing about this is that Zwoptex preserves the original image’s size while stripping away all transparent parts. So the images take up little space in the Texture Atlas but in game you don’t have to position them individually, you’ll simply place them at the center of the screen.
To achieve the endless scrolling effect two of each image where added side-by-side to each other, with one flipped on the X axis so the images align neatly. Whenever one image has scrolled outside the screen it is moved back to the right side of the screen. At the end I also fixed the vertical flicker lines which can appear due to round-off errors when moving the sprites. And of course they all are drawn with a CCSpriteBatchNode.
The SneakyInput fire button allows continuous shooting and faster shooting when you just tap it, while the thumb stick controls the ship’s movement in both analog and digital (8-way) variants. The Ship class’ setPosition method is overridden to keep the player’s ship within screen boundaries at all times. Finally an extension class gives SneakyInput the same autorelease initializers used by cocos2d, and adds another good example of just how useful Objective-C categories can be.
Chapter 7 - Side-Scrolling Shooter
The shooter game will be controlled with a virtual joystick using SneakyInput. The background parallax scrolling will be implemented not with the CCParallaxLayer, as it does not support endless scrolling (as far as I know, please correct me if I’m wrong). The rest will be gameplay code, mostly spawning enemies, moving them and collision tests.
The chapter will be submitted on Friday, August 13th. Yup, Friday the 13th. Scary.
Summary of working on Chapter 6 - Sprites In-Depth
I decided to rename this chapter to Sprites In-Depth as it deals mostly with Sprites, Sprite Batching (formerly known as Sprite Sheets), Texture Atlases and Zwoptex as well as general texture memory management. All the while laying the foundation for the game to be made in Chapter 7.
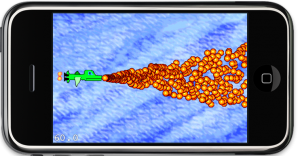 While working on this chapter I noticed that it’s awfully complex to create a CCAnimation class, especially if you’re not using a Texture Atlas. So I decided to illustrate how to add helper methods by adding them via a Objective-C Category to the CCAnimation class. Now you can create a CCAnimation with just one line of code, instead of around ten.
Once more I created some of my now famous doodle artworks. If anything this should show that even a programmer can do art. Or, well, at least something that vaguely resembles art.
I was a bit surprised by one thing though, and that is how little the use of the CCSpriteBatchNode contributed to the framerate in this particular case. I added all the bullets to a CCSpriteBatchNode and found only a 15% increase in performance, it went up from 45 fps to a little over 50 with all those bullets flying. I sort of expected a bigger impact from previous experiences.


