|
KoboldTouch brings you the best 2D game development experience for Apple’s platforms!
KoboldTouch is the only Objective-C, ARC-enabled 2D game engine built on the Model-View-Controller (MVC) design pattern. Write ambitious games with greater ease!
KoboldTouch is also a continuously evolving, customer driven game development framework for iOS & Mac OS X, designed by game industry veterans to incorporate game development best practices and decades of experience.
Learn more about KoboldTouch features and what’s in it for you:
Open the “About KoboldTouch” Page for Details
Not quite ready for KoboldTouch yet?
Fill out the KoboldTouch Survey. Let us know what you think of KT and how to make it better.
Get KoboldTouch!
KoboldTouch is available as a subscription program that entitles you to updates and support.
Choose Your Support & Updates Plan
Recurring billing may be cancelled at any time. The yearly plan is non-recurring.
Monthly
$14.95
You will be charged $14.95 every month.Quarterly
$39.95
You will be charged $39.95 every 3 months.One Year
$119.95
You will be charged $119.95 once. No automatic rebills.
60-Day Money Back Guarantee
If you’re not satisfied you can request a refund within 60-days from the date of purchase, directly via Clickbank.
Learn Cocos2D 2 - Game Development for iOS will finally be available on September 19th 2012. Completely updated for cocos2d-iphone 2.0, Kobold2D 2.0 and ARC.
But that isn’t all!
Essential Cocos2D - The Definitive Reference is an online documentation for cocos2d-iphone 2.0 and Kobold2D. More details soon. In the meantime, here’s a sample chapter about How Draw Order Works in Cocos2D.
UPDATE: Essential Cocos2D is now available!
What’s the difference?
Right now I’m trying to freshen up what little I know of OpenGL ES 1.1 so I’m up to speed with OpenGL ES 2.0. I keep using the old ES 1.1 functions, so I thought I’d take the opportunity to re-learn OpenGL ES 2.0 from the ground up.
This OpenGL ES 2.0 Primer is helpful if you want to gain an understanding what’s different (and cool) about OpenGL ES 2.0 when compared to 1.1. It won’t teach you how to use OpenGL ES 2.0 though. The High-End 3D Graphics with OpenGL ES 2.0 PDF covers the concepts in greater detail, and quickly runs you through all important processes from initialization to compiling shaders to shutting down OpenGL ES 2.0. Again I didn’t learn how to program but it helped me understand the GL ES 2.0 concepts.
But what I really wanted was to learn how to do things with OpenGL in the context of cocos2d. Which means I just need to draw stuff, I don’t need to know how to load textures and setup the viewport and things like that. Nevertheless, Ray Wenderlich has done a great job explaining how to create a OpenGL ES 2.0 iPhone project from scratch. And Jeff LaMarche covered ES 2.0 shaders in great detail. Continue reading »
I haven’t been able to find a list of all Objective-C @ compiler directives in one place. We all know the keywords like @interface and @implementation but others like @dynamic and @encode are lesser known, and possibly even much less understood.
Although I know most of them already, I couldn’t shake the feeling that I may be missing a hidden gem. So I made an effort to document all the Objective-C @ compiler directives in one place.
Upgrading cocos2d-iphone is a recurring issue for many developers but since it happens so infrequently during the lifecycle of a project, there’s just no routine to follow. Eventually you might want to upgrade cocos2d-iphone, so the question arises: how do you do that with the least amount of trouble?
As I’m going through the process of updating over 70 (!) Xcode projects for the second revision of my Learn Cocos2D book, I thought I should outline the steps to upgrade an existing Xcode 3 project which uses cocos2d-iphone v0.99.x to a Xcode 4 project that uses cocos2d-iphone v1.0.x.
Prerequisites: software update
Obviously, you want to download the latest cocos2d-iphone version and unzip it to any directory. Just remember where you unzipped it because that’s where you’ll copy the new library folders from.
You also want to make sure you’ve upgraded to Xcode 4 by now, by installing the iOS 4.3 (or later) SDK, if you haven’t done so already.
Caution: Make sure Xcode is closed during the first steps.
Step #1: delete libs folder contents
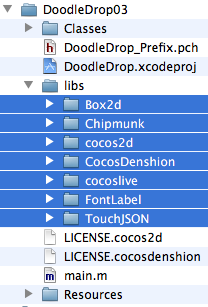
In your project’s folder, in this case DoodleDrop03, select all folders in the libs folder and delete them without mercy:
You’ll end up with an empty libs folder. In other words, don’t delete the libs folder itself or in case you did, make sure you re-create the libs folder.
Caution: The reason why I delete all the libraries in the libs folder instead of simply overwriting the libraries with new ones is simple: you can expect the updated cocos2d-iphone version to have removed or renamed some files. By first deleting all libraries you can be sure that no “zombie files” exist which are no longer used but might still be compiled when you later re-add the libraries. Such zombie files would screw up the build process and generate errors like “Duplicate defined symbols” and other such mishaps.
Step #2: copy the library folders
The first thing you’ll notice when you want to upgrade the libs (Box2D, Chipmunk, cocos2d, CocosDenshion, cocoslive, FontLabel and TouchJSON) is that they’re in different folders in the cocos2d-iphone project that you’ve downloaded and unzipped.
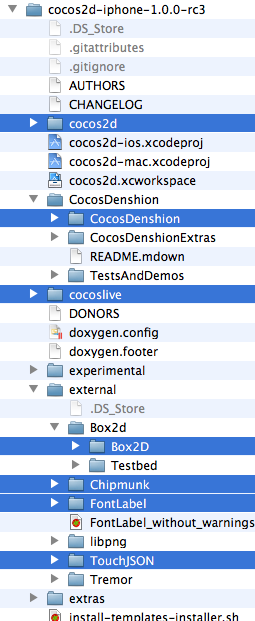
Make sure you select the exact same folders that are selected in the screenshot below:
This difference in folder layout can be a bit confusing. What you need to be aware of is that the Box2D, Chipmunk, FontLabel and TouchJSON folders are in the external folder in the cocos2d-iphone project. Furthermore, the Box2D folder that you should copy is a subfolder of Box2d. Note the difference in capitalization of the letter D. You want to copy the folder with the uppercase D: Box2D. The same goes for the CocosDenshion folder, you should select the CocosDenshion folder inside the CocosDenshion folder.
Caution: Make sure you don’t select the Box2D Testbed folder - if you do and copy that as well, Xcode 4 might lock up building the project, consuming 100% CPU power and requiring a force quit to shut it down.
Note: If you use only Chipmunk or Box2D physics, or neither of them, you can skip copying these folders of course.
To complete the copy opertation, go to the libs folder and paste the copied library folders so that you end up with a libs folder that looks exactly like the image in Step #1.
Tip: If you prefer drag and drop you can just drag the selected folders from one Finder window to another onto your project’s libs folder. This may be easier to do but you should remember to hold down the Option key while dropping so that you actually copy the folders instead of moving them. The copy operation is indicated by the green + icon underneath the cursor as you drag & drop while holding the Option key.
Step #3: Remove Library References
Open your project in Xcode 4 now.
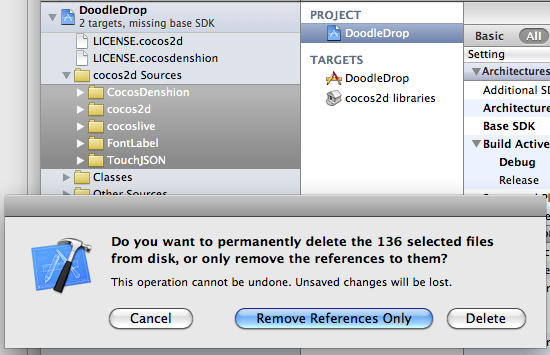
Select all groups under the cocos2d Sources group and hit Backspace to delete these groups (or right-click and choose Delete). You will be prompted with a dialog like in the screenshot below.
Make sure you select the default option Remove References Only to avoid deleting the new library folders you just copied:
Once you’ve removed the libraries groups, the cocos2d Sources group should be completely empty. You just got rid of all the old references, saving yourself from any potential compilation errors caused by references to files which may not exist anymore.
Step #4: Add Library Folders
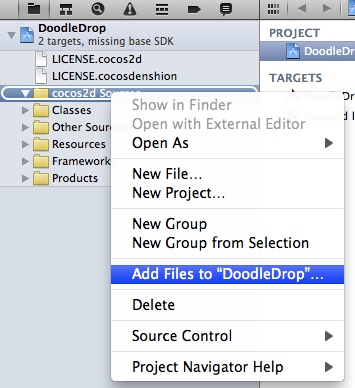
Next you want to re-add your library folders. Select and right click the cocos2d Sources group and select Add Files to “NameOfYourProject”…:
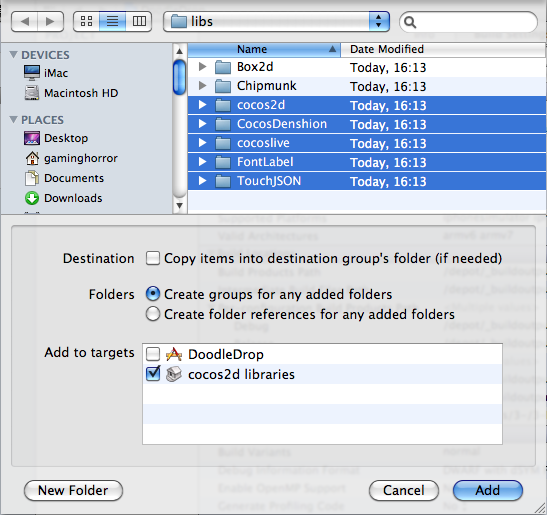
Browse into the project’s libs folder and select all the library folders that you need in your project.
You may have noticed that my project doesn’t use any physics engine, so I decided to not add them here. If you do use Box2D in your project you would want to also select Box2D of course. Likewise if you use Chipmunk.
Note: While it’s not a problem to add both physics engine folders, doing so might increase your App’s size.
Now, here’s where you need to be careful with the options! You want to make sure they’re set exactly as in the screenshot below. Most importantly, when adding files Xcode will default to add the files to the project’s main target (in this case DoodleDrop) instead of the cocos2d libraries target.
Make sure that only the cocos2d libraries target is selected to avoid any build errors:
Step #5: Build it!
You should now try and build the project. If you’re lucky, there won’t be any errors and you can continue with your work.
But most likely, depending on your project’s complexity and the changes made to cocos2d-iphone, you may have to fix any build errors that occur. Most of them are likely to be caused by classes that have been renamed or functions that have been deprecated. In this case you’ll have to find out through the API Reference and release notes what the changes are and how to fix them.
Fixing the “missing base SDK” message
One common issue that occurs specifically to older projects is the “missing base SDK” error. I think it was the Xcode version introduced with Mac OS X Snow Leopard (released Aug. 28th 2010) that eventually fixed this dreaded issue by adding a “latest iOS” option for the Base SDK Build Setting.
If you see a message like this (especially if it gives you a compile warning or error):
![]()
You should change the Base SDK Build Setting of your project to use the “Latest iOS” setting:
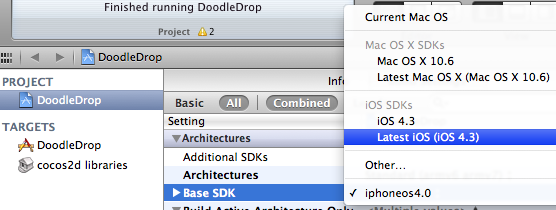
Note: In some cases it may be necessary to close Xcode 4 and re-open it to make the “missing base SDK” message go away.
Correctly Inheriting Build Settings
Normally, all targets in Xcode inherit the Build Settings of the project by default.
However, once you’ve made any change to any Build Setting at the target level this Build Setting will no longer inherit changes made to the same Build Setting on the project level. The default reaction by many developers is often to bite the bullet and check and re-check the Build Settings of the project as well as all targets, and to make the same change as many times as you have targets in your project.
Don’t do that, there’s a better and easier way!
You can have a Build Setting at the target level to default back to inherit the Build Setting defined at the project level. Likewise a Build Setting at the project level can be set to inherit from the OS default setting. In the screenshot below I have purposefully changed the Build Setting at the target level:
![]()
To have it default back to the project setting, which is Latest iOS (iOS 4.3) all you need to do is to select that Build Setting and hit the Delete key:
![]()
Tip: Switching from the Combined to the Levels view when reviewing the Build Settings makes it easy to see which Build Settings are inherited and which aren’t. You’ll also notice that any Build Setting that has been changed at the current level and doesn’t inherit its value anymore is printed in bold letters.
That’s it!
Happy coding with your newly updated cocos2d-iphone project! This upgrade tutorial will also be printed in the second revision of the Learn Cocos2D book.
Tip: With Kobold2D it will be even easier to upgrade your project because a simple copy & paste of the files in the kobold2d folder will suffice. If there are ever any additional steps to follow we’ll describe them in detail of course.
What you’ll get in bulletpoints:
- Five tutorials on how to create File and Project templates
- Extensive reference for all known TemplateInfo.plist items (keys) and settings
- Explanation of the placeholders (eg ___FILENAME___) and variables (eg ___*___)
- Frequently Asked Questions answered
- Many tips and tricks
- Total of 70 pages of documentation (PDF) from 70+ hours of experimentation
- File and Project Template example files
Synopsis
This unofficial but comprehensive Xcode 4 Template documentation explains how to create File and Project Templates for Xcode 4. Xcode 4 uses a template format significantly different from the one used in Xcode 3, which renders all previous information on Template creation useless. The new format is also much more complex and allows for greater flexibility, for example a template can now consist of multiple inherited templates.
This Xcode 4 Template documentation first gives you a quick overview what File and Project templates are. Step-by-step tutorials show you how to create your own File and Project Templates. In the reference section the format of the TemplateInfo.plist and related files are meticulously documented. Finally there’s the Frequently Asked Questions (FAQ) section with answers to common questions. The documentation is fully hyperlinked so that you can quickly look up keywords in the reference section. Several example files for File and Project Templates help you get started and can be used as the basis for your own templates.
Available for free
The documentation is now available for free:
Download Xcode 4 Template Documentation (ZIP, 6 MB)
Disclaimers
This is not official documentation. I can not guarantee that the documentation is 100% correct, much of the information was found out through lots of trial and error. Nevertheless this documentation contains a lot more information than what is currently available on the Internet.
THE DOCUMENTATION IS PROVIDED “AS IS”, WITHOUT WARRANTY OF ANY KIND, EXPRESS OR IMPLIED. IN NO EVENT SHALL THE AUTHORS OR COPYRIGHT HOLDERS BE LIABLE FOR ANY CLAIM, DAMAGES OR OTHER LIABILITY, WHETHER IN AN ACTION OF CONTRACT, TORT OR OTHERWISE, ARISING FROM, OUT OF OR IN CONNECTION WITH THE DOCUMENTATION OR THE USE OR OTHER DEALINGS IN THE DOCUMENTATION.
Xcode 4 Template Documentation
UPDATE:
You can get the Xcode 4 Template Documentation here!
The Xcode 4 Template Documentation has grown to nearly 40 pages (PDF) now, with only a few images and just reference material. The reference materials are nearly complete, including placeholders, variables and explanations for the use of every key available for Xcode 4 templates and a FAQ section. I still have to add the step-by-step tutorials (including example templates) for creating your own File Templates and Project Templates, and final proof reading and corrections.
Because the Xcode 4 Template Documentation has grown so big and I’ve already invested 50+ hours in it I want to try an experiment to see if creating documentation at this level of detail is sustainable. I’ll charge a small fee for access to the document, the standard price will be $15 and I’ll start selling it at an introductory price for a short period of time.
If this works out well in terms of revenue vs time investment I will likely offer more such in-depth documentation in the future. I was thinking that 50+ sales per month at $15 is a reasonable goal, and at this rate it would certainly be a welcome incentive for writing more documentation - next to me being generally inquisitive and interested in digesting challenging and diverse subjects.
I think the success of my book also ought to tell me that I can provide such in-depth treatments of game development topics. There’s certainly a lot of need for documentation on Cocos2D in general, but also there’s a big gap in general between what online documentation and tutorials offer (which often are only written for absolute beginners and/or to capture search engine traffic) versus the need of developers to learn more about a challenging niche subject in detail, including hard facts, recommendations, tips and tricks.
Cocos2D Podcast: coming soon …
Mohammad Azam aka @azamsharp recently approached me with the idea of creating a Cocos2D Podcast series. Azam has a lot of experience with creating podcasts and screencasts for the .NET crowd, and he has been a Cocos2D developer for about 6 months now with 4 kids apps already published to the App Store.
Two weeks ago we had a first dry run using Skype and liked the results, so we’re ready to record our first podcast this weekend if nothing gets in the way. I’m excited to try and see where we can take the Cocos2D Podcast and how you will like it.
The first podcast will be an introduction about ourselves and how we ended up working with Cocos2D, before we move on to trending topics in the Cocos2D space. If you have a suggestion for what we should discuss, or if you have a particular question that you like to get answered, please let me know (write a comment).
An apology
Lastly I wanted to apologize for missing last week’s update and not having much to report on this week. I was sick with a bad cold for the last ~10 days so nothing much happened in terms of Kobold2D or the Xcode 4 Template documentation. I’m still working on both of course.
I’m also responding to fewer and fewer emails, comments and forum posts as I’m getting swamped with them while spending a lot of time on other tasks. I realized I have to face the fact that as I gain popularity (much of it thanks to my book) I can no longer tend to everyone. Instead I’ll focus on listening in and providing value for a greater number of developers rather than responding to individual request. I’m sorry and I hope you understand.


