


The most frequent questions I get from readers of my Learn Cocos2D book:
- “Where can I download the source code?”
- “Why do I get compile errors in CCLabel?”
- “Is there an updated version of CCAnimationHelper?”
They all boil down to the fact that the book was written against cocos2d-iphone v0.99.5 with some projects using v0.99.4 and a few even had used v0.99.3.
Unfortunately this is also why some readers deducted one or more stars in their Amazon book reviews. Even more unfortunate because the changes that break the code were entirely cosmetic (renamed classes, function parameters removed or re-ordered, deprecated functions in favor of others). All changes required only fixing the lines using one of these outdated classes (CCLabel, CCLayerColor) or functions (bitmapFontAtlasWithString, frameWithTexture, …).
Quick List of Changes
I kept track of the changes I made to the source code. This is what it boils down to:
- remove: EAGLView viewWith… -> remove last parameter: preserveBackBuffer:NO
- remove: CCSpriteFrame: frameWithTexture -> remove last parameter: offset:CGPointZero
- remove: CCAnimation: animationWithName -> animationWithFrames & remove last parameter: frames
- rename: CCLabel -> CCLabelTTF
- rename: CCBitmapFontAtlas -> CCLabelBMFont
- rename: CCBitmapFontAtlas: bitmapFontAtlasWithString -> labelWithString
- rename: CCXxxxxTransition -> CCTransitionXxxxx
- rename: CCColorLayer -> CCLayerColor
- rename: CCQuadParticleSystem -> CCParticleSystemQuad
- rename: particle system: centerOfGravity -> sourcePosition
- change: particle system: use NSUInteger instead of int for initWithParticleCount
These are the changes affecting the book’s source code. There were some more changes in the cocos2d-iphone engine, for example some actions have been renamed as well.
Good News: Updated Source Code for v1.0
I updated the book’s source code to use cocos2d-iphone v1.0.0 rc2. Once the v1.0 final is released I’ll make another update.
You can get the book’s source code from the Learn Cocos2D Book product page (scroll to the bottom), or via this direct download link. The download is about 100 MB and contains all the chapter’s source code plus some extra projects not mentioned in the book, and all of them (over 70!) are now using cocos2d-iphone v1.0.
Note: This code obviously differs slightly from the code described in the first edition of the Learn Cocos2D book, so you should get the unmodified v0.99.x book source code as well.
Upgrading to Cocos2D v1.0
I also recently wrote a tutorial outlining the steps to update an existing cocos2d-iphone v0.99.x project to v1.0 in case you have an existing project that you’d like to upgrade to the latest Cocos2D version.
Learn Cocos2D: Second Edition
All these changes will be reflected in the second edition of the Learn Cocos2D book.
The second edition will be released summer 2011, likely around July to August. This is my estimate based on the fact that my work is scheduled to be completed on June 27th, and I’m working hard to keep that (tight) schedule.
Actually, make that we are working hard. The second edition of the Learn Cocos2D book will have contributions from a co-author. Someone who is well-known in the Cocos2D community! To be unveiled. 
Upgrading cocos2d-iphone is a recurring issue for many developers but since it happens so infrequently during the lifecycle of a project, there’s just no routine to follow. Eventually you might want to upgrade cocos2d-iphone, so the question arises: how do you do that with the least amount of trouble?
As I’m going through the process of updating over 70 (!) Xcode projects for the second revision of my Learn Cocos2D book, I thought I should outline the steps to upgrade an existing Xcode 3 project which uses cocos2d-iphone v0.99.x to a Xcode 4 project that uses cocos2d-iphone v1.0.x.
Prerequisites: software update
Obviously, you want to download the latest cocos2d-iphone version and unzip it to any directory. Just remember where you unzipped it because that’s where you’ll copy the new library folders from.
You also want to make sure you’ve upgraded to Xcode 4 by now, by installing the iOS 4.3 (or later) SDK, if you haven’t done so already.
Caution: Make sure Xcode is closed during the first steps.
Step #1: delete libs folder contents
In your project’s folder, in this case DoodleDrop03, select all folders in the libs folder and delete them without mercy:

You’ll end up with an empty libs folder. In other words, don’t delete the libs folder itself or in case you did, make sure you re-create the libs folder.
Caution: The reason why I delete all the libraries in the libs folder instead of simply overwriting the libraries with new ones is simple: you can expect the updated cocos2d-iphone version to have removed or renamed some files. By first deleting all libraries you can be sure that no “zombie files” exist which are no longer used but might still be compiled when you later re-add the libraries. Such zombie files would screw up the build process and generate errors like “Duplicate defined symbols” and other such mishaps.
Step #2: copy the library folders
The first thing you’ll notice when you want to upgrade the libs (Box2D, Chipmunk, cocos2d, CocosDenshion, cocoslive, FontLabel and TouchJSON) is that they’re in different folders in the cocos2d-iphone project that you’ve downloaded and unzipped.
Make sure you select the exact same folders that are selected in the screenshot below:

This difference in folder layout can be a bit confusing. What you need to be aware of is that the Box2D, Chipmunk, FontLabel and TouchJSON folders are in the external folder in the cocos2d-iphone project. Furthermore, the Box2D folder that you should copy is a subfolder of Box2d. Note the difference in capitalization of the letter D. You want to copy the folder with the uppercase D: Box2D. The same goes for the CocosDenshion folder, you should select the CocosDenshion folder inside the CocosDenshion folder.
Caution: Make sure you don’t select the Box2D Testbed folder - if you do and copy that as well, Xcode 4 might lock up building the project, consuming 100% CPU power and requiring a force quit to shut it down.
Note: If you use only Chipmunk or Box2D physics, or neither of them, you can skip copying these folders of course.
To complete the copy opertation, go to the libs folder and paste the copied library folders so that you end up with a libs folder that looks exactly like the image in Step #1.
Tip: If you prefer drag and drop you can just drag the selected folders from one Finder window to another onto your project’s libs folder. This may be easier to do but you should remember to hold down the Option key while dropping so that you actually copy the folders instead of moving them. The copy operation is indicated by the green + icon underneath the cursor as you drag & drop while holding the Option key.
Step #3: Remove Library References
Open your project in Xcode 4 now.
Select all groups under the cocos2d Sources group and hit Backspace to delete these groups (or right-click and choose Delete). You will be prompted with a dialog like in the screenshot below.
Make sure you select the default option Remove References Only to avoid deleting the new library folders you just copied:

Once you’ve removed the libraries groups, the cocos2d Sources group should be completely empty. You just got rid of all the old references, saving yourself from any potential compilation errors caused by references to files which may not exist anymore.
Step #4: Add Library Folders
Next you want to re-add your library folders. Select and right click the cocos2d Sources group and select Add Files to “NameOfYourProject”…:

Browse into the project’s libs folder and select all the library folders that you need in your project.
You may have noticed that my project doesn’t use any physics engine, so I decided to not add them here. If you do use Box2D in your project you would want to also select Box2D of course. Likewise if you use Chipmunk.
Note: While it’s not a problem to add both physics engine folders, doing so might increase your App’s size.
Now, here’s where you need to be careful with the options! You want to make sure they’re set exactly as in the screenshot below. Most importantly, when adding files Xcode will default to add the files to the project’s main target (in this case DoodleDrop) instead of the cocos2d libraries target.
Make sure that only the cocos2d libraries target is selected to avoid any build errors:

Step #5: Build it!
You should now try and build the project. If you’re lucky, there won’t be any errors and you can continue with your work.
But most likely, depending on your project’s complexity and the changes made to cocos2d-iphone, you may have to fix any build errors that occur. Most of them are likely to be caused by classes that have been renamed or functions that have been deprecated. In this case you’ll have to find out through the API Reference and release notes what the changes are and how to fix them.
Fixing the “missing base SDK” message
One common issue that occurs specifically to older projects is the “missing base SDK” error. I think it was the Xcode version introduced with Mac OS X Snow Leopard (released Aug. 28th 2010) that eventually fixed this dreaded issue by adding a “latest iOS” option for the Base SDK Build Setting.
If you see a message like this (especially if it gives you a compile warning or error):
![]()
You should change the Base SDK Build Setting of your project to use the “Latest iOS” setting:

Note: In some cases it may be necessary to close Xcode 4 and re-open it to make the “missing base SDK” message go away.
Correctly Inheriting Build Settings
Normally, all targets in Xcode inherit the Build Settings of the project by default.
However, once you’ve made any change to any Build Setting at the target level this Build Setting will no longer inherit changes made to the same Build Setting on the project level. The default reaction by many developers is often to bite the bullet and check and re-check the Build Settings of the project as well as all targets, and to make the same change as many times as you have targets in your project.
Don’t do that, there’s a better and easier way!
You can have a Build Setting at the target level to default back to inherit the Build Setting defined at the project level. Likewise a Build Setting at the project level can be set to inherit from the OS default setting. In the screenshot below I have purposefully changed the Build Setting at the target level:
![]()
To have it default back to the project setting, which is Latest iOS (iOS 4.3) all you need to do is to select that Build Setting and hit the Delete key:
![]()
Tip: Switching from the Combined to the Levels view when reviewing the Build Settings makes it easy to see which Build Settings are inherited and which aren’t. You’ll also notice that any Build Setting that has been changed at the current level and doesn’t inherit its value anymore is printed in bold letters.
That’s it!
Happy coding with your newly updated cocos2d-iphone project! This upgrade tutorial will also be printed in the second revision of the Learn Cocos2D book.
Tip: With Kobold2D it will be even easier to upgrade your project because a simple copy & paste of the files in the kobold2d folder will suffice. If there are ever any additional steps to follow we’ll describe them in detail of course.
What is Kobold2D?
It’s the Ultimate Cocos2D Project, of course. Or more precisely, the official name for it. Right now, the website www.kobold2.com is only a “coming soon” page while development is under way.
What’s in a name?
Calling it “The Ultimate Cocos2D Project” all the time would have become tedious rather quickly. I wanted a name that is reminiscent of Cocos2D yet completely different. As luck would have it, I’ve recently watched a lot of Battlestar Galactica episodes. You might remember that in this show humanity’s home planet is called Kobol. I couldn’t help but think of COBOL all the time. 😉
From there it was a small step to Kobold, which in germany is widely associated with a famous cartoon Kobold called Pumuckl. As a kid, I was a big fan of Pumuckl, so picking Kobold2D as the name was a no brainer. Even more so since it has the same ring to it than Cocos2D.
Why create a new brand name?
For one, giving the project a name of its own clearly makes it more attractive. It expresses a certain dedication to the project. It should also signal that it’s no longer just about Cocos2D. With all those extra libraries and additional glue code, plus an experimental project I’m working on, I’m tempted to call it a Game Development Kit (GDK). That’s the long term vision for Kobold2D: more power, easier - for everyone!
Speaking of long term, that’s another reason to give it its own brand name. The visionary thought being that ultimately, something like Kobold2D could be implemented for other game engines as well, with the same core values: give the developers more power, greater flexibility but at the same time make it easier for them to get started.
The Kobold Team
I’m not the only developer who is aching for a more professional work environment. Kobold2D is a joint-venture with another senior software developer and a couple helping hands who help out wherever and whenever they can. We agreed to share the development burden on a voluntary basis. We all have different stakes and interests in the development of Kobold2D.
For me personally the most important aspect is my ambition to develop a project for its users, both professional and casual. I know I can build professional systems that are easy to use, well documented and thus get the job done painlessly. This basically sums up what I’ve been doing for the past 10 years.
What we’re not doing …
There’s one issue I think i going to come up, which might confuse some people, so I want to be clear about this: we are not creating a branch of Cocos2D. We have no intention to do so. We use the library as is, and we stick to the stable builds. The same goes for all other libraries of course.
At the same time, we don’t push each and every line of our additional code back or even contribute to the development of the libraries in Kobold2D. That’s not what we set out to do, and we simply don’t want to spend too much time consulting with and compromising on changes with others when our code is already there and working for us. Our code uses the MIT License, so it’s there for the taking.
In very few cases we can’t get around to modify library code. We only do this where necessary, for example if it breaks our build and the fix is rather simple. Other than that, if a library doesn’t work to our satisfaction, we try to add our fixes and improvements on top, either by subclassing or by making use of Objective-C categories. So far this has been working very well and allows us to keep updating the underlying libraries with far fewer hassles.
Next steps
One big task that I set myself out to complete before continuing with Kobold2D is figuring out the Xcode 4 template format for File Templates and Project Templates. I almost have everything together after spending practically the whole week on it. I’m also documenting all my findings and I’m going to publish the Xcode 4 Template Tutorial / Reference / Documentation / Manual (not sure about the name yet) by the end of the month.
The goal for Kobold2D is to have various project templates, which is why I’m doing extensive research on the new Xcode 4 template format. Unfortunately at the moment it seems that it will not work satisfactory with cross-referenced Xcode projects, but I remain positive that I can find a solution.
Kobold2D private beta!
There will also be a private beta test for Kobold2D starting in a couple weeks (couple == definitely more than 2 weeks). Reply to the private beta sign-up thread if you want a chance to be picked for the private beta test.

I almost forgot about the Cocos2D-Project on github. While it works flawlessly with the latest v0.99.5 stable release of Cocos2D, it was still bundled with only the RC1 (release candidate). So I’ve updated the cocos2d version in the repository.
In case you don’t know what Cocos2D-Project is:
Cocos2D-Project is a great way to start any Cocos2D-iPhone based project.
It eases up- and downgrading the Cocos2D game engine at any time. It includes additional source code as well as multiple targets and build configurations for Ad Hoc & App Store distribution (creates the necessary IPA/ZIP files) and debugging of memory leaks and related issues.
Cocos2D-Project is free, open-source, uses the MIT License and comes already bundled with the cocos2d-iphone version that it currently works with “out of the box”.
It’s not affiliated with or endorsed by cocos2d-iphone.org and Ricardo Quesada. You will get support for Cocos2D-Project on Cocos2D Central.
Future updates
With the help of others, the Cocos2D-Project development has taken on a life of its own. The current work in progress is much more than a simple Xcode project referencing just the Cocos2D game engine. I’m looking forward to announce a big update in a couple weeks. Stay tuned.
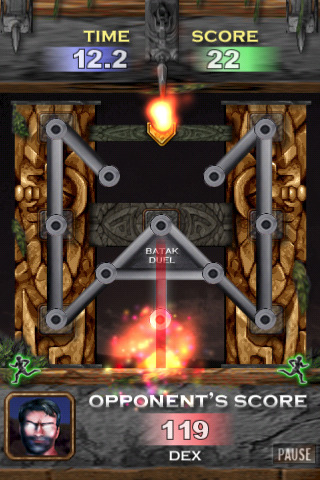 Dan Nelson has worked on his Cocos2D based game BATAK Duel (view it on iTunes) for 5 months. He received dozens of requests from fellow developers to share his source code. About 3 weeks ago he made the game’s source code available for purchase, for $297.
The feature list is quite impressive:
- A Complete iPhone Game Framework, can easily be customised for your next game!
- Seamless OpenFeint integration
- Learn how to set up OpenFeint achievements
- How to set up a menu system with multiple sections
- How to save and restore user settings
- How to implement a Singleton object for global variable support
- Discover how to create Fire and Smoke Effects
- How to set up a visually impressive ‘opponent ladder‘
- See how to use Particle systems to create superb visual effects (for example, a huge storm with torrential rain!)
- How to detect when a fast moving object has been touched by the player
- How to play multiple sound effects simultaneously
- How to play and pause music
- How to pause and resume the game
- How to handle the input of player ‘unlock codes‘ using a UITextField control
and a super cool transparent pop up keyboard!
- How to set up a smooth scrolling ‘Credits‘ section
Read Dan’s announcement or go ahead and purchase the BATAK Duel source code. What’s more, Dan has setup an affiliate link that you can put up on your website. For each sale made through the affiliate link you’ll get a 35% commission ($103.95). To make use of the affiliate link you have to register as affiliate with e-Junkie and select the BATAK Duel Cocos2D Source Code product.
By the way, you get the full Xcode project and all of the art, music and sound files but the asset files are not intended for redistribution, eg. you can’t include them in your own game.
Add your link to the Cocos2D Linkvent Calendar
Do you have something to share with the Cocos2D community? I haven’t received enough submissions to fill all the days until Xmas, although I do have enough links to post one each day, I’d rather post a link to your website or blog post.
Due to a number of breaking changes in the recent Cocos2D beta versions, including the rename of the Cocos2D project to cocos2d-ios.xcodeproj, I’ve made an update to my Xcode project. You know, the one from this tutorial that allows you to keep Cocos2D completely seperate from your own code, which in turn enables you to easily and safely up- and downgrade Cocos2D by merely replacing the Cocos2D folder.
So now it also works with Cocos2D and here is the download:
Download the Xcode Project (Cocos2D v0.99.5 beta 3 and later)
What you have to do to upgrade the project, in case you already started a project with my older Xcode template but would like to upgrade to Cocos2D v0.99.5 beta 3:
- remove the cocos2d-iphone project from your Xcode project
- follow these instructions from Select the Project itself up to and including Drag & Drop Libraries to Target
- (don’t forget to repeat the instructions for all targets you’re using, not just the current one)
- clean all targets and build
Note: depending on the iOS SDK version you’re on, you may have to Get Info on the Xcode project as well as the cocos2d-ios project and on the General tab set the Base SDK to iOS 4.x, then close and re-open the project (Xcode should update the SDK version immediately but sometimes it doesn’t).
If you plan to use Cocos2D v0.99.4 then the Xcode project supporting this Cocos2D version is still available here.


