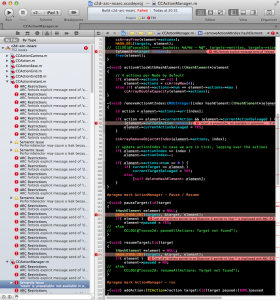
 While Cocos2D is compatible with ARC, simply enabling ARC in the project’s Build Setting will throw several hundreds of errors in your face. Cocos2D doesn’t provide ARC-enabled project templates. Thus this tutorial about how to enable ARC in a newly created Cocos2D Xcode Project.
While none of these steps are overly difficult, you’ll notice there’s plenty of steps to perform. Unavoidably, and on the off chance you don’t already know, I’d like to recommend Kobold2D to you if you want to write ARC enabled Cocos2D apps. Because none of the steps below, really zero, zilch, nada, niente, keine are necessary to enable ARC in Kobold2D. That’s because it ships with 15 template projects all of which have ARC enabled out of the box. And Kobold2D 2.0 with cocos2d-iphone 2.0 is just around the corner.
Self-advertisment aside, these steps are tested with cocos2d-iphone v2.0 but should also work with cocos2d-iphone v1.1 - but admittedly I haven’t tested the process with the v1.1 version. If you find anything that’s not quite working with v1.1 please leave a comment. Preferably with the solution, that’ll be awesome!
UPDATE: I released a video version of this tutorial: Continue reading »
Upgrading cocos2d-iphone is a recurring issue for many developers but since it happens so infrequently during the lifecycle of a project, there’s just no routine to follow. Eventually you might want to upgrade cocos2d-iphone, so the question arises: how do you do that with the least amount of trouble?
As I’m going through the process of updating over 70 (!) Xcode projects for the second revision of my Learn Cocos2D book, I thought I should outline the steps to upgrade an existing Xcode 3 project which uses cocos2d-iphone v0.99.x to a Xcode 4 project that uses cocos2d-iphone v1.0.x.
Prerequisites: software update
Obviously, you want to download the latest cocos2d-iphone version and unzip it to any directory. Just remember where you unzipped it because that’s where you’ll copy the new library folders from.
You also want to make sure you’ve upgraded to Xcode 4 by now, by installing the iOS 4.3 (or later) SDK, if you haven’t done so already.
Caution: Make sure Xcode is closed during the first steps.
Step #1: delete libs folder contents
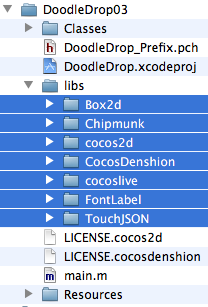
In your project’s folder, in this case DoodleDrop03, select all folders in the libs folder and delete them without mercy:
You’ll end up with an empty libs folder. In other words, don’t delete the libs folder itself or in case you did, make sure you re-create the libs folder.
Caution: The reason why I delete all the libraries in the libs folder instead of simply overwriting the libraries with new ones is simple: you can expect the updated cocos2d-iphone version to have removed or renamed some files. By first deleting all libraries you can be sure that no “zombie files” exist which are no longer used but might still be compiled when you later re-add the libraries. Such zombie files would screw up the build process and generate errors like “Duplicate defined symbols” and other such mishaps.
Step #2: copy the library folders
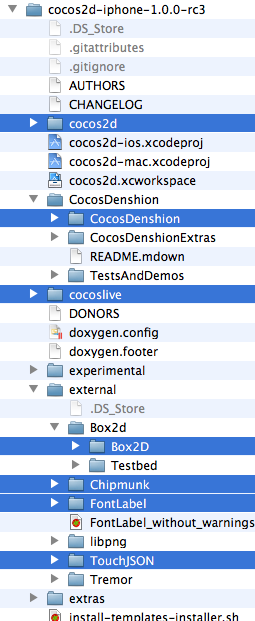
The first thing you’ll notice when you want to upgrade the libs (Box2D, Chipmunk, cocos2d, CocosDenshion, cocoslive, FontLabel and TouchJSON) is that they’re in different folders in the cocos2d-iphone project that you’ve downloaded and unzipped.
Make sure you select the exact same folders that are selected in the screenshot below:
This difference in folder layout can be a bit confusing. What you need to be aware of is that the Box2D, Chipmunk, FontLabel and TouchJSON folders are in the external folder in the cocos2d-iphone project. Furthermore, the Box2D folder that you should copy is a subfolder of Box2d. Note the difference in capitalization of the letter D. You want to copy the folder with the uppercase D: Box2D. The same goes for the CocosDenshion folder, you should select the CocosDenshion folder inside the CocosDenshion folder.
Caution: Make sure you don’t select the Box2D Testbed folder - if you do and copy that as well, Xcode 4 might lock up building the project, consuming 100% CPU power and requiring a force quit to shut it down.
Note: If you use only Chipmunk or Box2D physics, or neither of them, you can skip copying these folders of course.
To complete the copy opertation, go to the libs folder and paste the copied library folders so that you end up with a libs folder that looks exactly like the image in Step #1.
Tip: If you prefer drag and drop you can just drag the selected folders from one Finder window to another onto your project’s libs folder. This may be easier to do but you should remember to hold down the Option key while dropping so that you actually copy the folders instead of moving them. The copy operation is indicated by the green + icon underneath the cursor as you drag & drop while holding the Option key.
Step #3: Remove Library References
Open your project in Xcode 4 now.
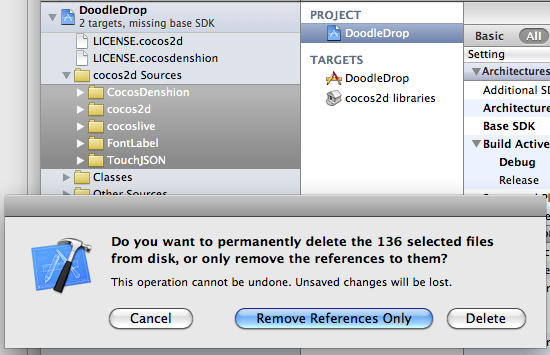
Select all groups under the cocos2d Sources group and hit Backspace to delete these groups (or right-click and choose Delete). You will be prompted with a dialog like in the screenshot below.
Make sure you select the default option Remove References Only to avoid deleting the new library folders you just copied:
Once you’ve removed the libraries groups, the cocos2d Sources group should be completely empty. You just got rid of all the old references, saving yourself from any potential compilation errors caused by references to files which may not exist anymore.
Step #4: Add Library Folders
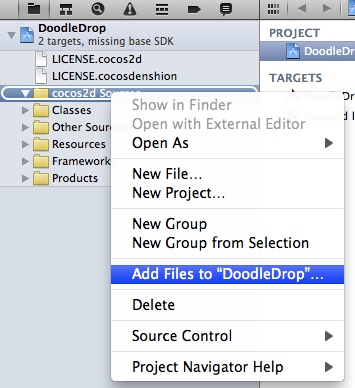
Next you want to re-add your library folders. Select and right click the cocos2d Sources group and select Add Files to “NameOfYourProject”…:
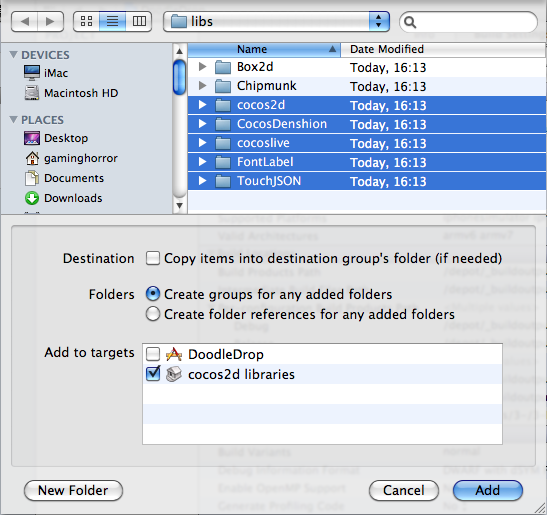
Browse into the project’s libs folder and select all the library folders that you need in your project.
You may have noticed that my project doesn’t use any physics engine, so I decided to not add them here. If you do use Box2D in your project you would want to also select Box2D of course. Likewise if you use Chipmunk.
Note: While it’s not a problem to add both physics engine folders, doing so might increase your App’s size.
Now, here’s where you need to be careful with the options! You want to make sure they’re set exactly as in the screenshot below. Most importantly, when adding files Xcode will default to add the files to the project’s main target (in this case DoodleDrop) instead of the cocos2d libraries target.
Make sure that only the cocos2d libraries target is selected to avoid any build errors:
Step #5: Build it!
You should now try and build the project. If you’re lucky, there won’t be any errors and you can continue with your work.
But most likely, depending on your project’s complexity and the changes made to cocos2d-iphone, you may have to fix any build errors that occur. Most of them are likely to be caused by classes that have been renamed or functions that have been deprecated. In this case you’ll have to find out through the API Reference and release notes what the changes are and how to fix them.
Fixing the “missing base SDK” message
One common issue that occurs specifically to older projects is the “missing base SDK” error. I think it was the Xcode version introduced with Mac OS X Snow Leopard (released Aug. 28th 2010) that eventually fixed this dreaded issue by adding a “latest iOS” option for the Base SDK Build Setting.
If you see a message like this (especially if it gives you a compile warning or error):
![]()
You should change the Base SDK Build Setting of your project to use the “Latest iOS” setting:
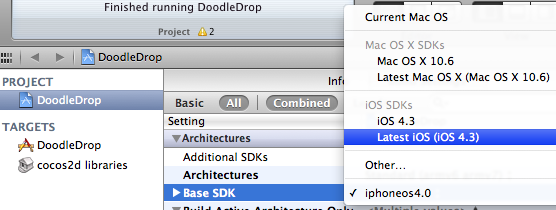
Note: In some cases it may be necessary to close Xcode 4 and re-open it to make the “missing base SDK” message go away.
Correctly Inheriting Build Settings
Normally, all targets in Xcode inherit the Build Settings of the project by default.
However, once you’ve made any change to any Build Setting at the target level this Build Setting will no longer inherit changes made to the same Build Setting on the project level. The default reaction by many developers is often to bite the bullet and check and re-check the Build Settings of the project as well as all targets, and to make the same change as many times as you have targets in your project.
Don’t do that, there’s a better and easier way!
You can have a Build Setting at the target level to default back to inherit the Build Setting defined at the project level. Likewise a Build Setting at the project level can be set to inherit from the OS default setting. In the screenshot below I have purposefully changed the Build Setting at the target level:
![]()
To have it default back to the project setting, which is Latest iOS (iOS 4.3) all you need to do is to select that Build Setting and hit the Delete key:
![]()
Tip: Switching from the Combined to the Levels view when reviewing the Build Settings makes it easy to see which Build Settings are inherited and which aren’t. You’ll also notice that any Build Setting that has been changed at the current level and doesn’t inherit its value anymore is printed in bold letters.
That’s it!
Happy coding with your newly updated cocos2d-iphone project! This upgrade tutorial will also be printed in the second revision of the Learn Cocos2D book.
Tip: With Kobold2D it will be even easier to upgrade your project because a simple copy & paste of the files in the kobold2d folder will suffice. If there are ever any additional steps to follow we’ll describe them in detail of course.
The important bit first: the price of the Line-Drawing Starterkit is back at $179!
The simple reason: customers voted with their wallet, it sold zero units at the $299 price point over the last two weeks while people kept asking me for rebates and price drops. I clearly misjudged the value proposition of the Starterkit and how much potential customers would be willing to spend.
About Thinking, Learning and Knowing
I’m going to be upfront about the sales numbers because I want to be instructive and convey the lesson’s I learned. I also find these numbers posts very intriguing myself. One of the things I love about working under my own terms is that I can choose how transparent you want to be. I feel there’s more to gain from transparency, being open and upfront, and sharing what you know then there is to lose.
I’ve actually been told a few times that you can’t sell to cocos2d developers. Which I find astonishing. “I don’t think there are sufficient willing customers” was the one sentence I received in an email which I find most telling. Thinking is not knowing. Thinking is: not knowing! Trying and not succeeding is ok, but thinking and not even trying is not. The former you might regret financially but seldom will you regret having done it. The latter is just being complacent and accepting the status quo, or simply a reluctance of pursuing unconventional business ideas.
 I can only say: I’ve learned a lot from running this website over the past 4 months. Certainly more valuable lessons and knowledge than from most of the books I own, and the above selection is just a fraction of my library. They are the books I hold most dear and are most relevant to my work right now, including Stephen Hawking’s Universe in a Nutshell as the perfect separator between left-brain (hard skill) and right-brain (soft skill) books. It puts everything in the proper perspective. I certainly didn’t expect to learn some of the lessons nor was it easy to deal with the very unexpected ones, but I did nevertheless. The good part about the hard lessons is that they make me think even harder to learn what I need to know to understand. I also have a bunch more unconventional ideas now. And I grok Invictus.
The Numbers
The Line-Drawing Game Starterkit has been on sale (40% off back then) from July 10th to August 1st, that’s 23 days. From July 10th until the public announcement on July 20th the sales were limited to my Newsletter subscribers, close to 670 people were given the password to access the sales page at the time.
When I formed the idea of selling a Starterkit, I punched some numbers about website traffic, pricing, conversion rates, looking at other products, thinking of what certain indicators could mean, why people are having success and why others don’t. Being a pessimist I came to about 3 sales per month if the price is around $200. That would have been nice, and would have allowed me a return of investment in less than 6 months. And when I was optimistic I thought I could be making up to 5-10 sales per month, perhaps by being featured prominently. I definitely had enough positive indicators to go ahead and try making and selling the Starterkit and being sufficiently convinced that it’ll have a positive impact, financially and otherwise.
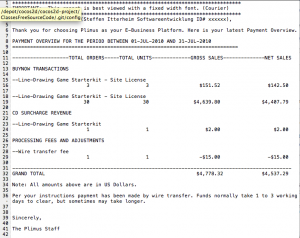
The reality is that I sold 30 copies at $179 each within 23 days! Way, way more than my expectations. See the screenshot of the payment report to the left for the monetary details. Note that the first section with 3 sales were test sales by myself, so that amount should be deducted from the total. Also, 30 times $179 does not equal the sum on the bill because surcharge fees depending on the payment method have already been deducted. Net sales is the amount after Plimus took their share, which is close to 5% if I remember correctly.
I estimated my return of investment (break even) at about $4,000. So overall it’s not bad. Not bad at all given that I made all those sales in 23 days instead of months.
The downside to this story is that after setting the price high at $299 I did not make a single sale in the past 2 weeks! This price point seems past a certain pain threshold that developers are feeling comfortable spending. Customers voted with their wallets and I basically killed my own business by modifying just one (crucial) aspect of it. I was my own worst enemy by making a wrong judgement call.
And of course I’ll try to fix it: from this day on forward the Starterkit’s regular price will be back at $179! It has proven to sell at this price point and I’m hoping to see sales pick up again. Despite this no-sales period of over 2 weeks the Starterkit earned me $120 per day on average, or an hourly rate of $15 assuming a regular 8-hour work day.
The Future
If it turns out that continued sales from the Starterkit allow me to live off it, I’m going to run this website full-time in the near future. That means more free stuff, more intriguing blog posts and every once in a while a new commercial product that targets very specific unfulfilled needs of cocos2d game developers. You might consider the cocos2d book to be one of these commercial products, and I intend to improve it after press by listening to reader’s feedback and filling any holes with free Tutorials and FAQ entries on this website. It will be a book that continues to get written.
More Lessons to learn
If you want to learn some business & marketing lessons in general I recommend reading The Long Tail to understand how niche markets work and Influence: The Psychology of Persuasion for a lesson in marketing which I find important to understand both from the seller’s and the customer’s point of view. The Long Tail was instrumental for me to actually become comfortable with the thought of selling a product to a niche audience and why that idea might just work. But also instrumental because I just keep shaking my head when I read the naive comments of some people. That’s also where how to deal with critics comes in handy.


