Kobold2D Preview 4 now available!

On September 28, 2011, in cocos2d, Kobold2D, by Steffen Itterheim

Without further ado:

Download Kobold2D Preview 4

Enjoy it!

The Most Important Changes & Additions:

Continue reading »

Kobold2D Website now online!

On August 28, 2011, in cocos2d, Kobold2D, by Steffen Itterheim

The Kobold2D Website is now online. Go, have a look and let me know what you think.

Here are some pointers to get you started about Kobold2D (in case you haven’t heard) and the Kobold2D website:

 
Not sure what that means? In essence Kobold2D wants to make development with Cocos2D easier and more powerful for you. And in case you’re wondering: yes, Kobold2D is free and open source.
 
Some of the things you should know about Kobold2D:

Kobold2D: Cocos3D Project Template

On June 25, 2011, in cocos2d, cocos3d, Kobold2D, by Steffen Itterheim

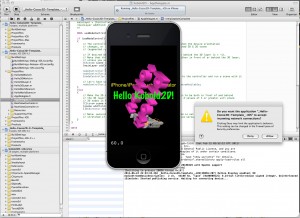
Today I completed the first draft of the Kobold2D chapter which will be in the second edition of the Learn Cocos2D book. In that chapter I’m also giving you an introduction to cocos3d, the official 3D add-on library for cocos2d. I ported cocos3d’s Xcode project template to Kobold2D and spiced it up a little with some cocos2d nodes in the back- and foreground:

Notice the “incoming network connection” warning. This is caused by the iSimulate library which is distributed with Kobold2D and activated by default for Simulator builds. You still need to buy the iSimulate App to benefit from it though. If you don’t you can also choose to ignore the dialog or simply disable iSimulate by commenting out a line in the project’s BuildSettings-iOS.xcconfig file.

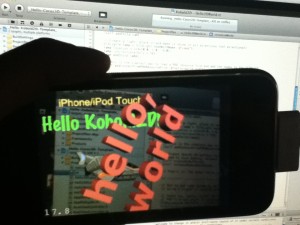
I’ve also had great fun with the augmented reality option that the cocos3d CCNodeController class provides. And setting it up is one line of code. Here’s the “camera as live background” demo in action:

Since a picture doesn’t really do it justice, here’s a video:

Admittedly it could run a little faster on my iPhone 3G. It’s pretty taxed and averages around 20 fps with the camera background view and rendering a 3D model. My iPod Touch 4 averages at around 40 fps and it feels a lot smoother.

Kobold2D Todo List

One of the biggest items on my todo list for Kobold2D is to design the website and get rid of the “coming soon” page. This includes setting up the wiki and filling it with content, documentation for the most part. And, well, paying $150 each month because I don’t see any alternative to using Confluence. I want to enjoy working on documentation, and I want you to enjoy browsing and reading it.

I also want to create more template projects. Currently, as you can see in the first screenshot, there’s Hello Kobold2D (iOS & Mac), Hello Cocos3D (iOS) and Hello Cocos2D-X (iOS). I want to add two more templates, one for Chipmunk with SpaceManager (iOS & Mac) and one for Box2D (iOS & Mac). I also want to add the projects from my book as project templates, namely Doodle Drop, the Shoot ’em Up game, the Orthogonal and the Isometric Tilemap projects, and the Cocos2D With UIKit project (all iOS).

Even though Kobold2D won’t have Xcode 4 Project Templates I still want to give you a quick and easy way start a new project based on one of the template projects. Notice the distinction between “project template” (those in Xcode’s New Project dialog) and “template project” (a regular, already existing project). I started writing a tool that allows you to create a copy of an existing Kobold2D template project and rename it, so that the workflow is just as convenient as doing it within Xcode. It works for the specific template I tested it with, but I still have to design the user interface and make the code fail-safe.

In case you wonder why Kobold2D won’t have Xcode Project Templates: they are not nearly as powerful as they would have to be. And they’re a pain in the rear to create and maintain without some tool support. But worst of all, you have no way of including files in an Xcode 4 project template that must not be added to the Project Navigator. Like, for example, .xcodeproj files.

The Ultimate Cocos2D Project: Libraries

On March 4, 2011, in cocos2d, Kobold2D, by Steffen Itterheim

The Ultimate Cocos2D Project is: Kobold2D!

Put simply: Kobold2D is designed to make Cocos2D developers more productive.

Original Post

Last week I wrote that I’m Building The Ultimate Cocos2D Xcode Project. In today’s weekly update I wanted to give you some more details on the use of libraries in that project.

Cocos3D included

So there happens to be a Cocos3D now. Rather than being part of the Cocos2D distribution, it’s an extension project. Guess what that means? Right, installing Cocos3D means fumbling with the dreaded install-templates.sh script (see this Cocos3D tutorial). Of course the first user reactions were: how do I install it? Installation failed, what am I doing wrong? And so on …

The Ultimate Cocos2D Project wouldn’t be ultimate if it didn’t include Cocos3D out of the box. And unmodified of course, as with all included libraries I want to make it as simple as possible to replace one library version with another. Once you get to half a dozen of included libraries, maintaining them all can become a hassle, so the very least I can do is to make it easy for everyone to upgrade specific libraries.

Obviously: Cocos2D included

Of course Cocos2D is also included as a static library as opposed to cluttering your project with all of its source files. Xcode project references make it very convenient to add external code and keeping it seperate. I’ve described the process in detail in my Cocos2D Xcode Project tutorial but since then I’ve learned a couple more things about how to make this even better.

For example, I no longer include cocos2d-iphone directly, instead there’s a seperate Xcode project in between so that I have full control over build settings (using XCConfig files) and make it possible to build both iOS and Mac OS targets in the same Xcode project. I will also include the current version of Cocos2D in the download because my goal is to make everything work out of the box.

No fumbling with install scripts, no additional downloads necessary, no need to modify any Xcode build settings - including developer certificates and header search paths. Build configurations for Ad Hoc and App Store release builds are also included, which will create .IPA and .ZIP files for you ready for Ad Hoc distribution respectively upload on iTunes Connect.

Popular libraries included

Now let’s get to the juicy part. Early on I realized that Cocos2D users often needed (or wanted) to include other libraries. Some of them have become so popular among the Cocos2D crowd that they could as well be part of the official distribution. Alas, they’re not. That’s a service I want to provide.

Often those libraries require special and non-obvious steps to successfully add them to an existing project. All too often those steps are either undocumented, untested, hard to follow, refer to outdated versions of Xcode, iOS SDK, etc. and generally require technical expertise of project configuration and compiler settings.

This is all taken care of for you. Here’s the list of libraries that are already included in the Ultimate Cocos2D Xcode Project:

That is quite a list. All you need to do to use these libraries is to either enable them in code or merely include the header file and start using them. If you worry that all these libraries will bloat your App, rest assured that Xcode is very clever: if you don’t actually make use of a static library (eg don’t include any of its header files), it will not be linked with your App and not waste any space or performance. I verified that.

Update policy

These are a lot of libraries to keep up to date. I plan to make about 4-8 point releases each year, usually triggered by a major (speak: non-beta) release of Cocos2D. If updating other libraries justifies an update depends on the library’s importance and the significance of the update.

Your libraries

Adding your own libraries to the project will be easy and the process will be documented. This will encourage code-sharing because your library will just work with other user’s project, it only needs to follow a few simple guidelines to become plugin-capable. This opens the door for better and tighter integration of 3rd party code into your projects. Even if you don’t intend to share your code, you’ll still benefit because your code will be easier to re-use and maintain.

Also, if you like you can make a request for a specific library or additional source code that should be included in the project, please leave a comment. I’ll see what I can do. :)

Accelerometer in Simulator

On October 21, 2010, in Programming, tools, by Steffen Itterheim

AccSim written by Otto Chrons is an App (download on iTunes) that allows you to control your game running in the Simulator with your iOS device. Meaning, the game plays in the Simulator but accelerometer input is actually coming from your device! You can learn more about it on the Built.By.Me website, which includes a sample video:

Hmmm … somehow this game seems strangely familiar. 😀

AccSim doesn’t pack the same punch as iSimulate does, which can also be used for sending multi-touch input, GPS and Compass events to the Simulator, plus a lot more. But the good thing about AccSim is that it’s not just free but the AccSim source code is open source!

Tagged with: