For the past two weeks I’ve been running a Cocos2D Developer Survey. As of today, 236 developers started the survey and 189 finished it completely. That’s 80% despite the many questions they had to answer.
Here are the results with my observations. I started the survey also to see if I was on track with KoboldTouch, and whether certain assumptions hold true. Specifically I had a hunch that cross-platform development is only perceived to have great value or appeal. Let’s see if I was right.
Click on each image for full resolution.
Who are you?
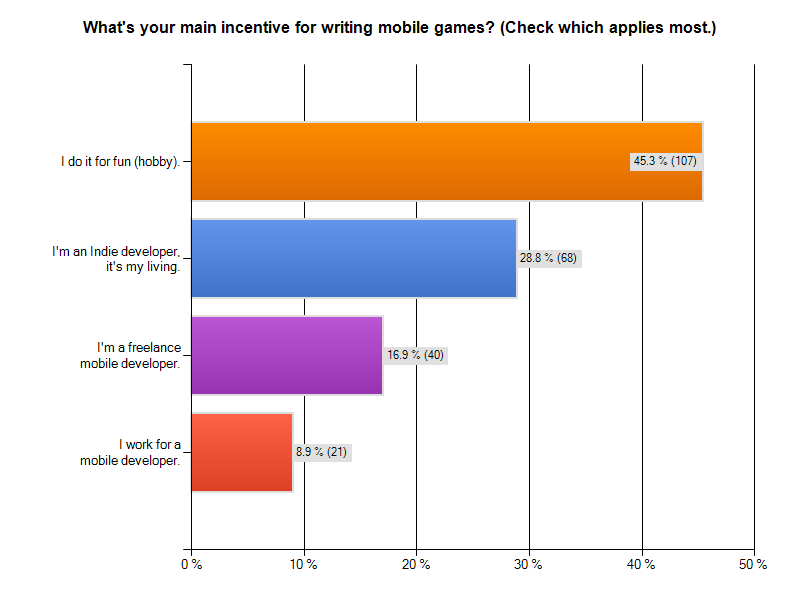
I was very curious how many cocos2d developers consider themselves to be hobbyists and indies compared to professionals, who either work for a mobile developer or are taking on freelance jobs as one.
Almost half of those who answered the survey are hobbyists. Nearly 30% consider themselves indies who make a living making mobile games. This is great! Continue reading »
I’m looking for a good Text Editor for Mac OS X that supports Lua (preferably without installing any additional files). And I also want the editor to support autocomplete (aka code completion) for the Lua language, as well as being able to extend the autocomplete keywords.
Much to my dismay this narrowed down the field quite a bit. Therefore I created this list with short (and subjective) reviews of Text Editors for Mac OS X which you may find a good extension to Wikipedia’s Comparison of text editors.
But first, I want to be sure we’re all on the same level when we talk about the autocomplete feature. This Qt Creator video with Thorbjørn Lindeijer (of Tiled Map Editor fame) shows you what this feature is all about (beginning at 0:15).
I wanted to find the text editor for Lua that suits my needs. Since there are so many text editors, I quickly dismissed those editors that didn’t support autocomplete. And those whose Lua support needs to be installed manually also took a backseat rather quickly. By all means: please do correct me where I’m wrong, inaccurate, etc. I’m also open to discussing the inception of a flame war, if deemed helpful. 
iTileMaps developed by Vsevolod Klementjev is a Cocos2D app for iPad that allows you to edit tilemaps in the TMX format, the same format used by the popular Tiled Map Editor.
Although built with Cocos2D the tilemaps created with iTileMaps can be used with any game engine that supports loading the TMX format. To get ahold of the tilemaps created with iTileMaps you can export them directly to your game or send them via e-mail. Great for designing levels on the road!
Check out this fast-forward movie to see it in action:
Check out the iTileMaps website and/or get it on the iTunes App Store.
In my book I explained how to create collision shapes for physic engines using the freely available version of VertexHelper Pro. Granted, it works, but as soon as you need to update your shapes frequently or you have many different shapes to edit it’s going to be a lot of manual work and error-prone copy & paste between VertexHelper’s code generator and your source code.
VertexHelper, meet your replacement: PhysicsEditor
PhysicsEditor was written by Andreas Löw, the author of the very popular TexturePacker tool. He has proved again that he can create powerful yet easy to use tools for game developers.
The greatest part about PhysicsEditor: it can automatically trace your shapes to generate collision shapes and it works flawlessly! You can even tweak the amount of vertices (and a lot of other things) as needed, for example if your physics engine has a limitation on how many vertices can be used for a collision shape (Box2D default: 8 vertices).
But it doesn’t just create the collision shapes, it also allows you to edit physics properties of a shape that often go along with it. Density, friction, “bouncyness”, and other parameters can be tweaked in the GUI.
As they say, an image speaks louder than words, so I suppose a video speaks in a thousand images:
Not just Cocos2D
PhysicsEditor currently exports to Cocos2D + Box2D (Chipmunk/SpaceManager support is forthcoming and should be available soon) and also to Sparrow Framework + Chipmunk and of course Corona SDK.
And it works on Windows, too! Which makes sense given that Corona supports Android development under Windows.
I also found this post about PhysicsEditor with a working Flash example (at the bottom). It seems that even exporting respectively using PhysicsEditor with Flash + Box2D seems to work well. Wow!
Brace for impact!
Check out the PhysicsEditor Features page to learn more about what this great tool can do for you! You can get PhysicsEditor alone for $17.94 but you can also grab a bundle deal which includes TexturePacker for $29.99, or almost 20% off.
Andreas Löw has released an updated version (v2.1) of his Texture Atlas creation tool called Texture Packer (Pro). The Pro version ($17.95) provides you with a GUI interface, the non-Pro version ($9.95) is a command line tool. The latter actually runs behind the scenes in the GUI version.
Here’s the list of changes introduced in Texture Packer v2.1:
The free version is now enhanced so that you can create textures up to 2048×2048 pixels without paying a single cent!
The free PVR/PVR.CCZ previewer lets you view the images - just doubleclick them in finder! Including preview for PVRTC.
Other features:
- *.pvr and *.pvr.ccz previewer! (free for all)
- AutoSD allows automatically creation of standard resolution images from highres images (-auto-sd) (pro/cli)
- Process *.tps files from command line (pro)
- Drag’n’drop sprites to tree view to add them
- PVRTC2/PVRTC4 compression
- Enhanced color reduction quality (pro/cli)
- Additional dithering algorithm (Atkinson)
- Linear quantization
- Nearest neighbour quantization
- Premultiply alpha (pro/cli)
- Option to disable automated alias creation
- Choose heuristics for MaxRects algorithm (pro/cli)
- Creation of non power of 2 textures
The update is available using auto-update or download from: http://texturepacker.com/download/
Read more about the Texture Packer features, read the Texture Packer manual (PDF) or go directly to the shop (Share*it!).
Add your link to the Cocos2D Linkvent Calendar
Do you have something to share with the Cocos2D community? I haven’t received enough submissions to fill all the days until Xmas, although I do have enough links to post one each day, I’d rather post a link to your website or blog post.
The previously command-line-only TexturePacker tool now has a nice GUI. It’s called the “Pro” version and for a reason. So far, I’ve been using Zwoptex for creating Texture Atlases, but I’ll certainly give TexturePacker Pro a try.
At first glance, what I liked was that it told me when the Texture Atlas was “full”, eg. not all sprites could fit into that Texture Atlas. And the always present list of image filenames on the right side is a welcome feature. Although Zwoptex does have this list as well, it’s almost rendered useless because it’s a seperate view option.
Zwoptex’ price has changed since I checked last time, it’s now at only $14.95. TexturePacker Pro costs $17.95, it’s command line version $9.95 and the upgrade from command line to Pro is $7,95, so you’re saving a whopping $0.05! 
A couple words on pricing
I find both tools are underselling themselves. Zwoptex was initially at $24.95 and even that price seemed “cheap” to me, given how much trouble it saved me and how much faster and more memory efficient it made my projects. I would say that a price range of $30 to $50 would be more than fair for those tools. I can imagine that the TexturePacker command line version at $9.95 and now the Pro version probably forced Zwoptex to adjust its price.
Problem is: this isn’t a market where people choose their tool based on a $3 price difference. Also, it decreases margins for upgrade prices, with TexturePacker upgrade already below $10. Those low-end prices incur a proportionally large amount of transaction fees, paid to the eCommerce vendor, making them less viable. Since this is also not a mass market, but a niche, it would be wiser if both upgraded their prices back to reasonable regions, around or above $30.
Likewise, Particle Designer is also absolutely undervalued at $7.99. Those low prices undercut the value in tools, and make tool development less and less attractive than it already is. And if anything, cocos2d and the other engines need one thing above all else: tools. And good ones!
Be it Ricardos mysterious “world editor” or the Physics + Tilemap IDE (website) or the other game editing tools currently being worked on - if any one of them is being released as a commercial product but sold for less than $30, I’m going to be very mad at you! If it’s less than $60 I’ll still be mad at you, not very, but still mad.
Rant
Seriously, this isn’t the App Store! It’s developers you’re selling to, and they do value useful tools. Just because cocos2d is free doesn’t mean that all tools surrounding it need to be cheap (or free for that matter). Take Sprite Manager 2 for example. It sells for $75 (per seat!) and isn’t all that different from Zwoptex or TexturePacker Pro. If it were a standalone app it would probably pale in comparison! You might argue that SM2 is for Unity, and their developers are less price sensitive - I don’t think so, and some are even more price sensitive because they just made that huge investment in the first place.
In general you could say that those developers who invest several hundred $$ into a game engine (and toolset) are simply more serious about game development. You do have those enthusiasts working with cocos2d as well, but they’re probably outnumbered by a lot of hobbyists and “I’ll give it a try” kind of people who simply join because of the fun involved, and because the only investment in cocos2d is time and they got plenty of that. The question is: do you want to be kind to the hobbyists, or do you want to build a sustainable business? Plus, Zwoptex and Texturer Packer are also being used by Corona developers.
Now you may also be arguing that a cheaper price allows more developers to enjoy the tools and we’re a friendly bunch and not a commercial, greedy corporation. Sure. But those prices do devalue everyone’s tools, so if anyone wanted to build a tool that takes maybe not just 1-2 months to build (initially), but maybe 4-6 months or more before it’s going to be useful, those price points are not very encouraging to start such a project. That doesn’t mean it won’t happen, but I do know that those people who could pull this off, are generally terrible at doing business. And easily influenced by comparable prices, punching a few numbers, and then getting on with their next train of thought which probably involves solving an obscure programming problem.
And the kind of tool that needs this time investment is the one I’ve been looking forward to since I first started working with cocos2d in May 2009. Back at the time I was convinced that by the end of 2009 cocos2d would be having a game editor or at least something to build the GUI and screens with. I wished for a fully-fledged, professional game level editor, with a physics editor, sprite animation builder, asset management, and whatever else you can dream of.
Now, if that ever happened, it shouldn’t cost less than $100. If you can provide killer features like Box2D integration or scripting game logic, ask twice as much. And offer Lite and Pro versions with a variety of feature sets to make the most out of what developers need and what they are willing to pay extra for niche, but very useful features if you need them.
Chapter 11 - Isometric Tilemaps
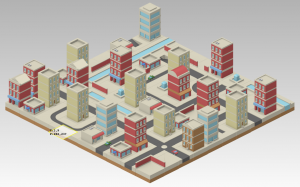
After Chapter 10 introduced Tiled and working with orthogonal tilemaps it’s time to step things up a notch and delve into isometric tilemaps. It starts with basic principles of isometric tilemaps and editing before going into detail on what’s different code-wise compared to orthogonal tilemaps. Obviously this has to include how to determine which isometric tile was touched and how to move a character across an isometric tilemap.
Summary of working on Chapter 10 - Working with Tilemaps
This chapter introduces you to tilemaps, what they are and what benefits and tradeoffs they provide. Without a doubt the most popular editor for tilemaps for use with cocos2d is the Tiled Map Editor. I explain how to use it over several pages before going into code and actually loading your first tilemap using cocos2d’s CCTMXTiledMap class.
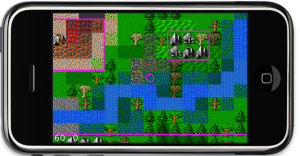 Loading a tilemap is just half the story. You’ll also learn how to manipulate the tilemap layers and individual tiles, as well as scrolling the tilemap and centering the touched tile on screen. The code takes care that the tilemap is never scrolled outside its boundaries.
While working with the Object Layer feature of Tiled (CCTMXObjectGroup in cocos2d) I noticed it’ll be handy to display the rectangles on the screen. So you’ll also learn a little custom drawing using OpenGL ES respectively cocos2d’s wrapper functions in CCDrawPrimitives.


