I have a seemingly simple requirement for my project: each node should have preUpdate and postUpdate methods in addition to the regular update method. Preprocessing and postprocessing before and after all entities have run their “update” logic is a common requirement in game development. Sometimes called the setup stage before processing all entities in the world, and the finalize stage to complete the current game step and possibly resolve collisions or check any win, lose or achievements conditions.
Of course there are alternative and some may argue “better” implementations, after all an experienced game dev might argue that using pre and post update methods are merely signs of a badly designed game update loop (the jury is out on that one). However beginning game developers definitely understand this concept much better and every game-making tool I know implements pre and post updates, so it has its validity. Plus I find it more convenient than “outsourcing” some logic to a central game loop.
On the other hand it’s also bad practice to rely on one node’s update method to be called before or after all others. Especially once you get to prioritizing update method calls among various groups of nodes it’s just going to get you into trouble. If you set the priority wrong just once you can introduce very subtle issues that’ll be hard to track down. Think of some objects not colliding with the player, or some monsters crashing when you shoot at them with a specific weapon. Scheduled methods should never rely on the order they are called for various entities.
Not so easy …
It turns out the system in Cocos2D only allows one update method per node. That means for each node you can only have one update selector, and via the priority parameter you can only control when its update method is called relative to all other nodes’ update method. In that way you can at least ensure that the player’s update method is always called first, or last, depending on your requirements. But it’s bad programming practice to do so.
I thought, why not just schedule a “regular” selector with CCScheduler? Well, they don’t have a priority, and they are always called after any update method, so you could never schedule a “before update” method this way. And those scheduled selectors aren’t meant to be used for selectors that are called every frame due to the additional processing overhead (eg allocating, updating and releasing the CCTimer object, and comparing & updating time elapsed every frame).
So I had to write a class called ScheduleMultiUpdate which creates proxy instances, registers them with CCScheduler to receive an update message of their own, and then they forward that message to the actual node implementing the special update selector. By using the priority you can define if the selector is called before or after the regular update by using a negative (before) respectively a positive priority (after, must be 1 or greater).
Example Code
Here’s an example usage scheduling the beforeUpdate and afterUpdate selectors to be called before and after the regular update method.
KKScheduleMultiUpdate* multiUpdate;
// in implementation (.m)
-(void) scheduleUpdateMethods
{
multiUpdate = [[KKScheduleMultiUpdate alloc] initWithNode:self];
[multiUpdate scheduleUpdateSelector:@selector(beforeUpdate:) priority:-1];
[self scheduleUpdateWithPriority:priority];
[multiUpdate scheduleUpdateSelector:@selector(afterUpdate:) priority:1];
}
// this has to be cleanup because CCScheduler retains scheduled targets
// we have to give KKScheduleMultiUpdate a chance to unschedule its selectors or it won't be deallocated
-(void) cleanup
{
[multiUpdate release];
multiUpdate = nil;
[super cleanup];
}
-(void) beforeUpdate:(ccTime)delta
{
}
-(void) update:(ccTime)delta
{
}
-(void) afterUpdate:(ccTime)delta
{
}
Here’s the actual implementation of KKScheduleMultiUpdate and its proxy class. Notice how the KKScheduleMultiUpdate simply retains a list of proxies and creates new ones, while the proxy class registers itself with CCScheduler to schedule its own update method based on the given priority, and then forwards the message to the baseNode. There’s currently no way to unschedule an update selector, but it should be fairly easy to add if you ever need to unschedule an update method while the game is running (I’d rather just use a bool and skip update).
@interface
/** Allows you to schedule multiple update methods per node. */
@interface KKScheduleMultiUpdate : NSObject
{
CCNode* baseNode;
CCArray* updateProxies;
}
-(id) initWithNode:(CCNode*)node;
-(void) scheduleUpdateSelector:(SEL)selector priority:(int)priority;
@end
/** Since there can be only one update selector scheduled per instance, this proxy will implement
that update method and forward the message to the desired selector. */
@interface KKScheduleMultiUpdateProxy : NSObject
{
id target;
SEL selector;
TICK_IMP impMethod;
}
-(id) initWithTarget:(id)target selector:(SEL)selector priority:(int)priority;
@end
@implementation
@implementation KKScheduleMultiUpdate
-(id) initWithNode:(CCNode*)node
{
if ((self = [super init]))
{
NSAssert(node != nil, @"%@ %@ - node is nil!", NSStringFromClass([self class]), NSStringFromSelector(_cmd));
baseNode = [node retain];
updateProxies = [[CCArray alloc] initWithCapacity:1];
}
return self;
}
-(void) dealloc
{
CCLOG(@"%@ %@", NSStringFromSelector(_cmd), self);
[baseNode release];
baseNode = nil;
// must do a cleanup to unschedule CCSelector, this is because CCScheduler retains scheduled targets
[updateProxies makeObjectsPerformSelector:@selector(cleanup)];
[updateProxies release];
updateProxies = nil;
NSAssert([self retainCount] == 1, @"%@ %@ - retainCount on cleanup should be 1 but is %i", NSStringFromClass([self class]), NSStringFromSelector(_cmd), [self retainCount]);
[super dealloc];
}
-(void) scheduleUpdateSelector:(SEL)selector priority:(int)priority
{
NSAssert([baseNode respondsToSelector:selector], @"%@ %@ - node %@ does not respond to selector", NSStringFromClass([self class]), NSStringFromSelector(_cmd), baseNode);
// TODO: might want to check here if the selector happens to be already scheduled
KKScheduleMultiUpdateProxy* proxy = [[KKScheduleMultiUpdateProxy alloc] initWithTarget:baseNode selector:selector priority:priority];
[updateProxies addObject:proxy];
[proxy release];
}
@end
@implementation KKScheduleMultiUpdateProxy
-(id) initWithTarget:(id)target_ selector:(SEL)selector_ priority:(int)priority
{
if ((self = [super init]))
{
NSAssert(target_ != nil, @"target is nil");
NSAssert(selector_ != nil, @"selector is nil");
target = target_; // weak ref
selector = selector_; // weak ref
impMethod = (TICK_IMP)[target methodForSelector:selector];
NSAssert(impMethod != nil, @"selector is not an instance method of target %@", target);
[[CCScheduler sharedScheduler] scheduleUpdateForTarget:self priority:priority paused:NO];
}
return self;
}
-(void) cleanup
{
CCLOG(@"%@ %@", NSStringFromSelector(_cmd), self);
[[CCScheduler sharedScheduler] unscheduleUpdateForTarget:self];
impMethod = nil;
NSAssert([self retainCount] == 1, @"%@ %@ - retainCount after cleanup should be 1 but is %i", NSStringFromClass([self class]), NSStringFromSelector(_cmd), [self retainCount]);
}
-(void) dealloc
{
CCLOG(@"%@ %@", NSStringFromSelector(_cmd), self);
[super dealloc];
}
-(void) update:(ccTime)delta
{
impMethod(target, selector, delta);
}
@end
As always, you’re free to use this code. I release it under the MIT License. You do not need to include a copyright notice, but I’d appreciate any mention or backlink to this website.
I’m now hosting an unofficial Cocos2D (for iOS & Mac OS) API Reference, accessible via the Knowledge Base tab.
What’s so “unofficial” about it?
My version of the API reference includes previously undocumented classes, some are documented but just not in the official documentation, others are completely undocumented but at least now you know they’re there. Currently, there is no additional documentation added other than what’s in the official cocos2d source code files, and as far as I can tell nothing is missing. If there is, please let me know.
Since at least the release of v0.99.5 about a month ago important classes like CCLayer, CCArray and CCDirectorIOS have been missing from the official API reference. Did anyone even take notice, or was it just me? I hope it will be fixed soon and the missing classes added back to the official API reference.
I’d like to call it “unofficial” just to make sure everyone gets the idea that I’m not involved in the development of Cocos2D in any way, and my version of the API reference may contain crucial omissions or mistakes as well.
Angry Birds Tutorial causes slowdown
Current and well-deserved cause of the cocos2d-iphone.org slowdown is the SpaceManager Game Tutorial with source code by the mobile bros. LLC. The tutorial shows you how to make an Angry Birds style of game.
An ongoing discussion about how to correctly send/receive data with Game Kit on Cocos2D Central prompted me to write a demo project to complement the Learn Cocos2D book’s Game Center chapter. The resulting working code is in this post, and also reprinted below.
The Game Kit Data Send/Receive Demo Project (download here) is based on the Learn Cocos2D book code made for the Game Center Chapter. It’s called Tilemap16 just to stay in line with the naming scheme.
You control the little Ninja as usual, but this time anytime you move it, it will also move on all other connected devices because the tile coordinate is sent via Game Kit to all connected players but only when it actually changes. The demo even allows you to move the Ninja on any device, and all others will follow, so it truly works in every direction. In addition, a score variable (int) is transmitted every frame just to show how to send different types of data at different times.
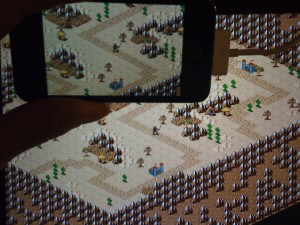
I wish I could have made a movie to show how cool this is but alas, my iPod was busy running the demo, so all I can show as proof is my iPod and iPad running the game with both Ninjas at the same position (mushy image made with my already-ancient iPhone 3G under perfect programming but terrible lighting conditions):
Source Code Example
In summary this is the code that’s used to send/receive data with the help of the GameKitHelper class I wrote for the book (also included in the download and free to use for anyone and any purpose):
typedef enum
{
kPacketTypePoint,
} EPacketTypes;
typedef struct
{
EPacketTypes type;
} SPacketInfo;
typedef struct
{
EPacketTypes type;
CGPoint point;
} SPointPacket;
Sending a packet:
{
CGPoint location = [touch locationInView: [touch view]];
SPointPacket packet;
packet.type = kPacketTypePoint;
packet.point = location;
gkHelper = [GameKitHelper sharedGameKitHelper];
[gkHelper sendDataToAllPlayers:&packet length:sizeof(packet)];
}
Receiving the packet:
{
// first, assume it's the general SPacketInfo, that way we can access type
SPacketInfo* packet = (SPacketInfo*)[data bytes];
switch (packet->type)
{
case kPacketTypePoint:
{
SPointPacket* pointPacket = (SPointPacket*)packet;
CCLOG(@"received point: %.1f, %.1f", pointPacket->point.x, pointPacket->point.y);
break;
}
default:
CCLOG(@"received unknown packet type %i", packet->type);
break;
}
}
Requirements & Setup
You need:
- 2 devices which are Game Center capable, eg they must have the Game Center App installed. If it isn’t, that device is not ready for Game Center. 1st & 2nd Generation devices up to iPhone 3G do not support Game Center. In addition Simulator will not work due to Matchmaking/Invites not being supported on the Simulator.
- 2 Game Center accounts (you can create dummy accounts via the Game Center App)
What you have to do:
- Create a new App on iTunes Connect, enable Game Center for that App, and replace the Bundle ID of your App with the one in the project’s info.plist. Please refer to the Game Center section in the iTunes Connect documentation.
- Make sure Push Notifications are enabled on all devices via Settings App.
- Run the Game Center App on both devices, login and make sure each device is logged in with a unique account. Then invite the other device’s account as friend and accept the friend request, this makes it easier to join each other’s matches.
- Build the Tilemap16 App and deploy it to both devices. Whenever you make a change to the code, you must deploy the App to both devices again, to make sure they run the same code.
- Run the App on one device, wait for the matchmaking screen to appear. Invite your other device’s friend account to join the match.
- Wait on the other device for the match invite to pop up. Tap Accept. The Tilemap16 game will launch.
- Tap Play Now on the first device once the other player has successfully connected and is ready.
- Move the Ninja on either device and watch it move on the other.
Enjoy!
I needed a way to clip the contents of a node to a specific area of the screen. The goal was to create a scrollable list of items and clipping the items at the top and bottom as they are being scrolled up and down on the screen. The list is of course longer than the screen is high. While you can achieve the same effect by drawing a sprite on top of the scrolling view, I was looking for a cleaner, more flexible and faster solution.
That’s where the glScissor command comes into play. Unfortunately the coordinates are always assuming portrait mode, so you have to rotate them to be able to use Cocos2D coordinates with glScissor. I did some research and found the solution for transforming glScissor coordinates but the rest of that code is too verbose (eg 9 lines instead of the 3 lines needed to transform the Landscape coordinates) and inefficient by needlessly transforming the coordinates every frame.
So I ended up making my own subclass of CCNode called ClippingNode whose children are only drawn within the clippingRegion CGRect (it’s in points). It takes into consideration device rotation and only adjusts the coordinates when either the device rotation changes (name:UIDeviceOrientationDidChangeNotification) or whenever the clippingRegion is updated. In addition the node sets its position at the lower left corner of the clipping region with the contentSize set to the clippingRegion size. By doing so children of the ClippingNode can access the clipping region without having to know that the parent is a ClippingNode class.
To use the ClippingNode, simply add it to your scene hierarchy, then add all other nodes (sprites, labels, etc.) which you want to clip to the ClippingNode. The ClippingNode children will only be drawn with whatever parts are inside the clippingRegion. All other nodes which you do not want to clip you just add to the scene hierarchy as usual. You can of course use two ClippingNodes side-by-side, for example to create a splitscreen view.
ClippingNode.h
#import "cocos2d.h"
/** Restricts (clips) drawing of all children to a specific region. */
@interface ClippingNode : CCNode
{
CGRect clippingRegionInNodeCoordinates;
CGRect clippingRegion;
}
@property (nonatomic) CGRect clippingRegion;
@end
ClippingNode.m
@interface ClippingNode (PrivateMethods)
-(void) deviceOrientationChanged:(NSNotification*)notification;
@end
@implementation ClippingNode
-(id) init
{
if ((self = [super init]))
{
// register for device orientation change events
[[NSNotificationCenter defaultCenter] addObserver:self selector:@selector(deviceOrientationChanged:)
name:UIDeviceOrientationDidChangeNotification object:nil];
}
return self;
}
-(void) dealloc
{
[[NSNotificationCenter defaultCenter] removeObserver:self name:UIDeviceOrientationDidChangeNotification object:nil];
[super dealloc];
}
-(CGRect) clippingRegion
{
return clippingRegionInNodeCoordinates;
}
-(void) setClippingRegion:(CGRect)region
{
// keep the original region coordinates in case the user wants them back unchanged
clippingRegionInNodeCoordinates = region;
self.position = clippingRegionInNodeCoordinates.origin;
self.contentSize = clippingRegionInNodeCoordinates.size;
CCDirector* director = [CCDirector sharedDirector];
CGSize screenSize = [director winSize];
// glScissor requires the coordinates to be rotated to portrait mode
switch (director.deviceOrientation)
{
default:
case kCCDeviceOrientationPortrait:
// do nothing, coords are already correct
break;
case kCCDeviceOrientationPortraitUpsideDown:
region.origin.x = screenSize.width - region.size.width - region.origin.x;
region.origin.y = screenSize.height - region.size.height - region.origin.y;
break;
case kCCDeviceOrientationLandscapeLeft:
region.origin = CGPointMake(region.origin.y, screenSize.width - region.size.width - region.origin.x);
region.size = CGSizeMake(region.size.height, region.size.width);
break;
case kCCDeviceOrientationLandscapeRight:
region.origin = CGPointMake(screenSize.height - region.size.height - region.origin.y, region.origin.x);
region.size = CGSizeMake(region.size.height, region.size.width);
break;
}
// convert to retina coordinates if needed
region = CC_RECT_POINTS_TO_PIXELS(region);
// respect scaling
clippingRegion = CGRectMake(region.origin.x * scaleX_, region.origin.y * scaleY_,
region.size.width * scaleX_, region.size.height * scaleY_);
}
-(void) setScale:(float)newScale
{
[super setScale:newScale];
// re-adjust the clipping region according to the current scale factor
[self setClippingRegion:clippingRegionInNodeCoordinates];
}
-(void) deviceOrientationChanged:(NSNotification*)notification
{
// re-adjust the clipping region according to the current orientation
[self setClippingRegion:clippingRegionInNodeCoordinates];
}
-(void) visit
{
glPushMatrix();
glEnable(GL_SCISSOR_TEST);
glScissor(clippingRegion.origin.x + positionInPixels_.x, clippingRegion.origin.y + positionInPixels_.y,
clippingRegion.size.width, clippingRegion.size.height);
[super visit];
glDisable(GL_SCISSOR_TEST);
glPopMatrix();
}
@end
I often start out with new code using dummy graphics. Until I figure out what exactly I need and what is going to work, I work with single image files added to the project’s resources. Creating a texture atlas is always the last step I do, once everything is settled. Creating and updating a Texture Atlas adds just a few extra steps but I always strive to avoid any unnecessary extra steps during a creative working period. Especially while experimenting. Any repetitive task hampers creativity.
But eventually, I will have to go in and change every CCSprite initialization code from spriteWithFile to spriteWithSpriteFrameName. Except, I don’t.
The following is a simple extension category for CCSprite that extends CCSprite with a spriteWithSpriteFrameNameOrFile initializer. It looks for the given file name in the CCSpriteFrameCache. If it exists as CCSpriteFrame, it uses that sprite frame and otherwise it reverts back to loading the sprite from file. Very easy, very helpful.
#import "cocos2d.h"
@interface CCSprite (Xtensions)
+(id) spriteWithSpriteFrameNameOrFile:(NSString*)nameOrFile;
@end
#import "CCSpriteExtensions.h"
@implementation CCSprite (Xtensions)
+(id) spriteWithSpriteFrameNameOrFile:(NSString*)nameOrFile
{
CCSpriteFrame* spriteFrame = [[CCSpriteFrameCache sharedSpriteFrameCache] spriteFrameByName:nameOrFile];
if (spriteFrame)
{
return [CCSprite spriteWithSpriteFrame:spriteFrame];
}
return [CCSprite spriteWithFile:nameOrFile];
}
@end
I almost forgot about the Cocos2D-Project on github. While it works flawlessly with the latest v0.99.5 stable release of Cocos2D, it was still bundled with only the RC1 (release candidate). So I’ve updated the cocos2d version in the repository.
In case you don’t know what Cocos2D-Project is:
Cocos2D-Project is a great way to start any Cocos2D-iPhone based project.
It eases up- and downgrading the Cocos2D game engine at any time. It includes additional source code as well as multiple targets and build configurations for Ad Hoc & App Store distribution (creates the necessary IPA/ZIP files) and debugging of memory leaks and related issues.
Cocos2D-Project is free, open-source, uses the MIT License and comes already bundled with the cocos2d-iphone version that it currently works with “out of the box”.
It’s not affiliated with or endorsed by cocos2d-iphone.org and Ricardo Quesada. You will get support for Cocos2D-Project on Cocos2D Central.
Future updates
With the help of others, the Cocos2D-Project development has taken on a life of its own. The current work in progress is much more than a simple Xcode project referencing just the Cocos2D game engine. I’m looking forward to announce a big update in a couple weeks. Stay tuned.
This is a common and ongoing issue Cocos2D users are having. I wrote a short article on how to do it properly, so that the templates are installed and any existing are overwritten.
Article: Installing Cocos2D Xcode Project Templates.
Which brings me to another question:
How would you like an installer for Cocos2D that automatically does this for you?
UPDATE: I made an installer for Cocos2D which also installs the Xcode templates. Grab it here.







The winners of the Learn Cocos2D book contest are …
On Xmas day I started a Book contest where you could win 5 copies of the print version of my Cocos2D book. Now here are the winners!
Three Winners for outstanding contributions
These are the winners that I picked because of what they said in their comments respectively other contributions they made:
Marcotronic for his stunning adaptation of the Beatles’ song “Let it be”. He wrote new lyrics, then re-recorded the song with his own voice. It made me laugh and gave me goosebumps at the same time. I promote this to be the official Learn Cocos2D book hymn!
Let it be: Learn Cocos2D
Dad of Geek And Dad for his heartwarming story about his neighbor being laid off. Things like that shouldn’t happen so undeservedly and I hope his neighbor finds renewed spirit when he receives the book as a gift.
The G man for being so passionate about Cocos2D besides his situation. He only has a dialup connection and the country he lives in doesn’t even allow him to register a domain or join the iOS Development program. I just hope there aren’t any import regulations for programming books.
G also posted this funny reimagination of the Cocos2D logo:
Those are the outstanding commentors that I simply could not resist gifting a book to because of their comments. Congratulations!
Three Lottery Winners
I still had two more winners to pick but couldn’t decide, so I chose to do a lottery to give everyone else a fair chance. I also decided I can spare one additional copy, so there are now 3 lottery winners chosen randomly from the remaining 22 unique commentors with the help of Excel’s RANDBETWEEN() function.
Without further ado, the three lottery winners are:
Dani
Tom
dzk34
Congratulations to all winners! I will contact you by email shortly.
I also wish everyone a Happy New Year 2011! May your code compile and your games sell.