Put simply: Kobold2D is designed to make Cocos2D developers more productive.
Original Post
First Friday update after the teaser post. I’m working on a new project. I’m still fleshing out the details of the “killer-feature” and making tests, so I can’t really talk about that. But I can tell you what I have already up and running.
The Ancestor: cocos2d-project
You may remember the Xcode Cocos2D project tutorial I wrote almost a year ago. The goal of that was to use Cocos2D as an external library in order to be able to update Cocos2D simply by pulling a new version from git, or just by replacing the Cocos2D folder. I gave the resulting project a boring, uninteresting, generic name (so typical for a programmer): cocos2d-project.
The new and improved cocos2d-project not only has a spiffy name (to be announced) but also raises the bar not one but two or maybe even three levels, depending on perceived value. It’s definitely leaps and bounds ahead of the Cocos2D distribution project, especially if you care for how source code projects should be composed.
One Xcode project for both iOS & Mac OS X Targets
One thing that really bothered me when Cocos2D became capable to build Mac OS X applications was that it required a separate Xcode project for each platform. If you’ve ever done cross-platform development you know this isn’t going to make you happy. Every action needs to be done twice, add a resource in one project, then you must also add it in the other. Change a build setting in one project, also change it in the other. Build and run in one project, then build and run the other project with a completely different window layout and probably duplicating all the floating windows aka “Is that the Mac OS debugger or is it the one for the iOS project?”. You name it.

I did some research, then a test, and It turns out: it’s entirely possible to target both the Mac OS X and iOS platform from within the same Xcode project. It works like a charm!
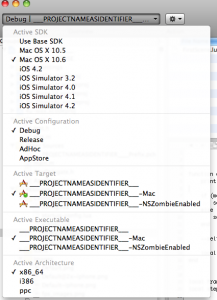
Really the only thing you need to keep in mind is that Xcode doesn’t give you the option to change the Active SDK by default. But if you click the Overview dropdown while holding down the Option key, you can select any SDK that’s installed on your system (see the image). The key here is to first change the Active Target to the Mac target, then Option-Click again and select Mac OS X 10.6 as the Active SDK. And the other way around to change back to iOS. So it’s a two step process but still way more comfortable than managing two seperate Xcode projects.
XCConfig Build Configuration
Behind the scenes there’s an additional step required to make this work, which I’ve been wanting to do for a long time: to use XCConfig files for build settings. Cocoaphony has a blog post Abandoning the Build Panel describing the technique. The good part is: there’s less confusion between project-wide and target-specific build settings. Even more importantly, if you build several different libraries you want to build them with the exact same settings - with XCConfig files this is easy to do, manually changing the build settings of several projects with multiple targets simply isn’t practical.
Plus you can document each setting and you can still use the Build Settings Panel for your own needs while allowing me to use system-critical changes to the Build Settings. For example, if a certain build setting causes issues (eg like the switch to LLVM GCC) then I can change the setting and release a new version of the project, or just the build config file separately. You can then replace that file and it should fix the build (assuming you haven’t change that exact setting in the Build Panel). All of your customized Build Settings will remain untouched of course.
Those are only two very fundamental improvements on a system engineering level which probably won’t excite you too much if you focus on making games with any means necessary. I’m keeping the good stuff for a future update, hopefully in 3 to 4 weeks I’ll be able to give you some first details about the “killer-feature”. 
 I'm Steffen Itterheim, author of Learn Cocos2D and iOS game developer.
I spend my time working for the Cocos2D and Kobold2D community.
Kobold2D is a beginner-friendly version of Cocos2D for iOS & Mac. To help support its development I would appreciate it if you consider purchasing the products I offer.
Cocos2D Podcast (iTunes)


