In my book I explained how to create collision shapes for physic engines using the freely available version of VertexHelper Pro. Granted, it works, but as soon as you need to update your shapes frequently or you have many different shapes to edit it’s going to be a lot of manual work and error-prone copy & paste between VertexHelper’s code generator and your source code.
VertexHelper, meet your replacement: PhysicsEditor
PhysicsEditor was written by Andreas Löw, the author of the very popular TexturePacker tool. He has proved again that he can create powerful yet easy to use tools for game developers.
The greatest part about PhysicsEditor: it can automatically trace your shapes to generate collision shapes and it works flawlessly! You can even tweak the amount of vertices (and a lot of other things) as needed, for example if your physics engine has a limitation on how many vertices can be used for a collision shape (Box2D default: 8 vertices).
But it doesn’t just create the collision shapes, it also allows you to edit physics properties of a shape that often go along with it. Density, friction, “bouncyness”, and other parameters can be tweaked in the GUI.
As they say, an image speaks louder than words, so I suppose a video speaks in a thousand images:
Not just Cocos2D
PhysicsEditor currently exports to Cocos2D + Box2D (Chipmunk/SpaceManager support is forthcoming and should be available soon) and also to Sparrow Framework + Chipmunk and of course Corona SDK.
And it works on Windows, too! Which makes sense given that Corona supports Android development under Windows.
I also found this post about PhysicsEditor with a working Flash example (at the bottom). It seems that even exporting respectively using PhysicsEditor with Flash + Box2D seems to work well. Wow!
Brace for impact!
Check out the PhysicsEditor Features page to learn more about what this great tool can do for you! You can get PhysicsEditor alone for $17.94 but you can also grab a bundle deal which includes TexturePacker for $29.99, or almost 20% off.
Chapter 13 - Physics Game
After the introduction of the physics engines Box2d and Chipmunk, this chapter will focus on one physics engine in greater depth by making a physics game using Box2d.
What kind of game? If you have an idea real quick let me know, because I haven’t decided yet. I was thinking about a space game with gravity but also a bit like Pinball, or more like a Sandbox game with some optional goals. Or something else entirely. The only caveat is: it has to be do-able in less than a week while also writing the chapter and I should be able to illustrate some details about the physics engine! That’s no mean feat.
Summary of working on Chapter 12 - Physics Engines
I basically split this chapter in half and gave each of the two physics engines, Box2d and Chipmunk, a good treatment. Initially I started with the templates provided by cocos2d, just to get all the code together and not having to talk about setting up the Xcode project. I quickly realized that the application templates are inadequate, erroneous and outdated, probably because they have barely been maintained as both Box2d and Chipmunk matured. They seriously need a refresher, and I was thinking that maybe I’ll turn the two projects for this chapter into cocos2d application templates for physics engines, replacing the current ones and using my Xcode template project, so that I don’t need to go in and change them every time cocos2d gets an update.
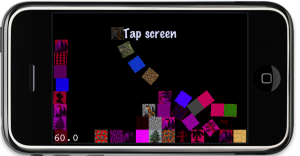 Anyway, both physics engines got their treatment and I built the same project for both. So now you can actually compare them, side-by-side, be it performance or behavior or just plain coding style or number of lines.
Unfortunately, there’s a lot to talk about even for just doing the basics. I got both projects to the point of adding more boxes to the world, then adding rudimentary collision detection and a simple joint example with 4 bodies strung together. There wasn’t enough space for more. But I did foresee it which is why I planned in the Physics Game chapter as a follow-up. Let me know real quick if you have an idea for a simple physics game, or send me a link to an existing game on the App Store. Ideally within the next 24 hours.
My Opinion
I once again realized why some developers may be preferring Chipmunk because it is more “direct” and easier to pickup, as in you just add a new callback method and that’s that. I can see that but it’s very misleading. Chipmunk is making me cry by throwing all those one-letter e, u, i, f, m, p, etc. fields at me, so I’ll have to remember that u is for friction, for example. I’m not a machine! And because you can’t hide private fields in C those are exposed as well, adding to the confusion. I found myself having to look up a lot of things frequently in the Chipmunk manual. The bad thing is, it’s a manual, and not an API reference - but I keep having to use it like it were an API reference by using search a lot. Box2d provided a much cleaner API and both a manual and an API reference, which made it a lot less painful to figure things out, to look things up.
People’s arguments about which physics engine is better often runs along the lines of language, features, performance, memory footprint and what not. But if I have to choose, I’d say both are fairly complete and mature physics engines, so for me the choice is really about API design and documentation. And in that area, Box2d is the clear winner in my book. Of course, I kept a neutral tone writing the book, I don’t want to bias anyone because at the end of the day, the important thing is that you can make a great game with both engines, and not everyone is familiar with C++ and that’s a very daunting language to learn.
Chapter 12 - Physics Engines: Box2d & Chipmunk
This chapter gives you an introduction to physics engines and what they can do. Since cocos2d supports two physics engines out of the box, Box2d and Chipmunk, I will explain how to do the same things in both physics engines and I aim to cover at the very least the basic elements like shapes, joints and collisions.
Because choosing either physics engine is often done on subjectively. Some developers may prefer the Object-Oriented C++ nature of Box2d while others may feel more comfortable with the C-based interface of Chipmunk (*). At the very least I want to present both and show their strength and weaknesses by example.
(*) Note: there is an Objective-C binding for Chipmunk made by Howling Moon Software. It’s free to use on Mac OS X and iPhone Simulator but costs $200 per title if you want to publish to the App Store. I believe that most cocos2d developers wouldn’t mind spending up to $30 on a tool or library that is essential, that is why I included Zwoptex and Particle Designer in the book. This product however is in a different ballpark price-wise.
On the other hand, the free Chipmunk SpaceManager also aims to offer better integration with cocos2d-iphone and promises a simplified Objective-C interface. I will have a look at the SpaceManager and then decide whether I’ll discuss it in the book, I say it’s likely. Another physics tool that has gotten some attention is the VertexHelper which I’ll at the very least will refer to.
Summary of working on Chapter 11 - Isometric Tilemaps
Isometric tilemaps rock! That is, if you can get all those nasty issues solved. Even though all the issues like graphics glitches at tile edges, correct z-ordering and the proper blend functions have all been discussed and solved by now, it’s still very challenging to get an isometric tilemap on the screen and a player walking over it, with no glitches at all. I believe this chapter will give a lot more developers the chance to delve into the exciting world of isometric tilemaps. I too learned a lot making this example game, and part of me now wants to write an old-school isometric RPG game. Again. For the n-thousand-th time. Sigh. Some day, some day …
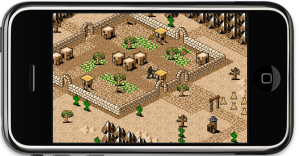 Anyhow, the project I made over the course of this chapter features properly z-ordered tiles and a player sprite, which moves tile-by-tile over the isometric tilemap. You control the player by simply touching in the direction relative to the player that he should move to. One specialty of this project is that the player always remains centered on the screen, he doesn’t move at all! It’s simply the tilemap that is moved under him, which makes a couple things much easier.
Nevertheless you also learn how to find the tile coordinates for a tile that you touch on the screen. And how to avoid the isometric, diamond-shaped tilemap to show the “outside” of the world by adding a border around the tilemap and limiting movement to the playable area. Similarly, the blocking tiles like walls, mountains and houses all block the player’s movement by drawing over the map with a collision layer and a tile whose property is set to “block_movement”.
In the meantime, if you want to gain a better understanding of how isometric tilemaps work, I can recommend the Isometric Projection article by Herbert Glarner. And in case you’re wondering how I suddenly and dramatically increased my art skills, I’ll be honest: I didn’t. I used the terrific tilesets from David E. Gervais which are published under the Creative Commons License. It means you are free to to copy, distribute and transmit those tiles as long as you credit David Gervais as their creator. You can download these tiles from Pousse Rapiere’s website or you can directly download them all at once as 6.4 MB ZIP file here. If you like to hear it from the man, here’s a bit of insight and history from David explaining how these tiles were made.


