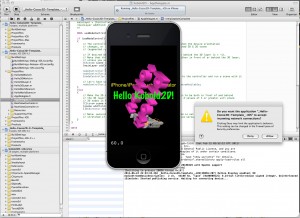
Today I completed the first draft of the Kobold2D chapter which will be in the second edition of the Learn Cocos2D book. In that chapter I’m also giving you an introduction to cocos3d, the official 3D add-on library for cocos2d. I ported cocos3d’s Xcode project template to Kobold2D and spiced it up a little with some cocos2d nodes in the back- and foreground:
Notice the “incoming network connection” warning. This is caused by the iSimulate library which is distributed with Kobold2D and activated by default for Simulator builds. You still need to buy the iSimulate App to benefit from it though. If you don’t you can also choose to ignore the dialog or simply disable iSimulate by commenting out a line in the project’s BuildSettings-iOS.xcconfig file.
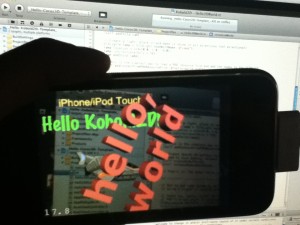
I’ve also had great fun with the augmented reality option that the cocos3d CCNodeController class provides. And setting it up is one line of code. Here’s the “camera as live background” demo in action:
Since a picture doesn’t really do it justice, here’s a video:
Admittedly it could run a little faster on my iPhone 3G. It’s pretty taxed and averages around 20 fps with the camera background view and rendering a 3D model. My iPod Touch 4 averages at around 40 fps and it feels a lot smoother.
Kobold2D Todo List
One of the biggest items on my todo list for Kobold2D is to design the website and get rid of the “coming soon” page. This includes setting up the wiki and filling it with content, documentation for the most part. And, well, paying $150 each month because I don’t see any alternative to using Confluence. I want to enjoy working on documentation, and I want you to enjoy browsing and reading it.
I also want to create more template projects. Currently, as you can see in the first screenshot, there’s Hello Kobold2D (iOS & Mac), Hello Cocos3D (iOS) and Hello Cocos2D-X (iOS). I want to add two more templates, one for Chipmunk with SpaceManager (iOS & Mac) and one for Box2D (iOS & Mac). I also want to add the projects from my book as project templates, namely Doodle Drop, the Shoot ’em Up game, the Orthogonal and the Isometric Tilemap projects, and the Cocos2D With UIKit project (all iOS).
Even though Kobold2D won’t have Xcode 4 Project Templates I still want to give you a quick and easy way start a new project based on one of the template projects. Notice the distinction between “project template” (those in Xcode’s New Project dialog) and “template project” (a regular, already existing project). I started writing a tool that allows you to create a copy of an existing Kobold2D template project and rename it, so that the workflow is just as convenient as doing it within Xcode. It works for the specific template I tested it with, but I still have to design the user interface and make the code fail-safe.
In case you wonder why Kobold2D won’t have Xcode Project Templates: they are not nearly as powerful as they would have to be. And they’re a pain in the rear to create and maintain without some tool support. But worst of all, you have no way of including files in an Xcode 4 project template that must not be added to the Project Navigator. Like, for example, .xcodeproj files.
Upgrading cocos2d-iphone is a recurring issue for many developers but since it happens so infrequently during the lifecycle of a project, there’s just no routine to follow. Eventually you might want to upgrade cocos2d-iphone, so the question arises: how do you do that with the least amount of trouble?
As I’m going through the process of updating over 70 (!) Xcode projects for the second revision of my Learn Cocos2D book, I thought I should outline the steps to upgrade an existing Xcode 3 project which uses cocos2d-iphone v0.99.x to a Xcode 4 project that uses cocos2d-iphone v1.0.x.
Prerequisites: software update
Obviously, you want to download the latest cocos2d-iphone version and unzip it to any directory. Just remember where you unzipped it because that’s where you’ll copy the new library folders from.
You also want to make sure you’ve upgraded to Xcode 4 by now, by installing the iOS 4.3 (or later) SDK, if you haven’t done so already.
Caution: Make sure Xcode is closed during the first steps.
Step #1: delete libs folder contents
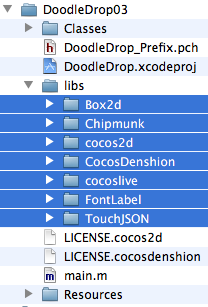
In your project’s folder, in this case DoodleDrop03, select all folders in the libs folder and delete them without mercy:
You’ll end up with an empty libs folder. In other words, don’t delete the libs folder itself or in case you did, make sure you re-create the libs folder.
Caution: The reason why I delete all the libraries in the libs folder instead of simply overwriting the libraries with new ones is simple: you can expect the updated cocos2d-iphone version to have removed or renamed some files. By first deleting all libraries you can be sure that no “zombie files” exist which are no longer used but might still be compiled when you later re-add the libraries. Such zombie files would screw up the build process and generate errors like “Duplicate defined symbols” and other such mishaps.
Step #2: copy the library folders
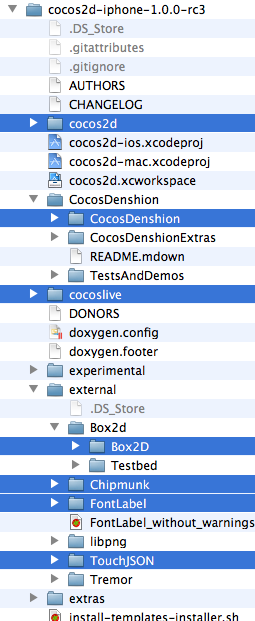
The first thing you’ll notice when you want to upgrade the libs (Box2D, Chipmunk, cocos2d, CocosDenshion, cocoslive, FontLabel and TouchJSON) is that they’re in different folders in the cocos2d-iphone project that you’ve downloaded and unzipped.
Make sure you select the exact same folders that are selected in the screenshot below:
This difference in folder layout can be a bit confusing. What you need to be aware of is that the Box2D, Chipmunk, FontLabel and TouchJSON folders are in the external folder in the cocos2d-iphone project. Furthermore, the Box2D folder that you should copy is a subfolder of Box2d. Note the difference in capitalization of the letter D. You want to copy the folder with the uppercase D: Box2D. The same goes for the CocosDenshion folder, you should select the CocosDenshion folder inside the CocosDenshion folder.
Caution: Make sure you don’t select the Box2D Testbed folder - if you do and copy that as well, Xcode 4 might lock up building the project, consuming 100% CPU power and requiring a force quit to shut it down.
Note: If you use only Chipmunk or Box2D physics, or neither of them, you can skip copying these folders of course.
To complete the copy opertation, go to the libs folder and paste the copied library folders so that you end up with a libs folder that looks exactly like the image in Step #1.
Tip: If you prefer drag and drop you can just drag the selected folders from one Finder window to another onto your project’s libs folder. This may be easier to do but you should remember to hold down the Option key while dropping so that you actually copy the folders instead of moving them. The copy operation is indicated by the green + icon underneath the cursor as you drag & drop while holding the Option key.
Step #3: Remove Library References
Open your project in Xcode 4 now.
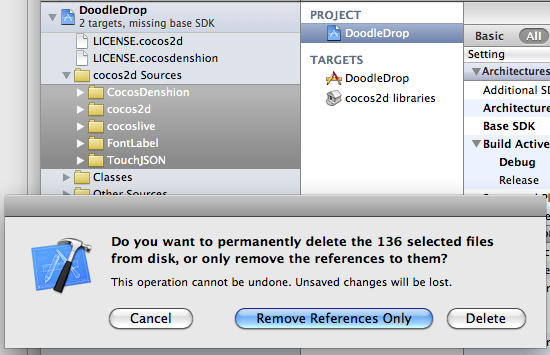
Select all groups under the cocos2d Sources group and hit Backspace to delete these groups (or right-click and choose Delete). You will be prompted with a dialog like in the screenshot below.
Make sure you select the default option Remove References Only to avoid deleting the new library folders you just copied:
Once you’ve removed the libraries groups, the cocos2d Sources group should be completely empty. You just got rid of all the old references, saving yourself from any potential compilation errors caused by references to files which may not exist anymore.
Step #4: Add Library Folders
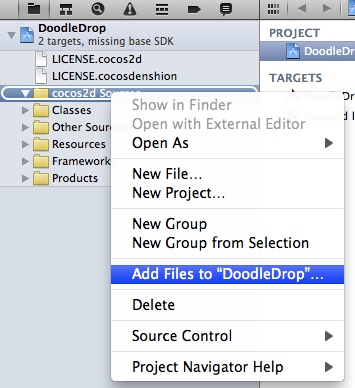
Next you want to re-add your library folders. Select and right click the cocos2d Sources group and select Add Files to “NameOfYourProject”…:
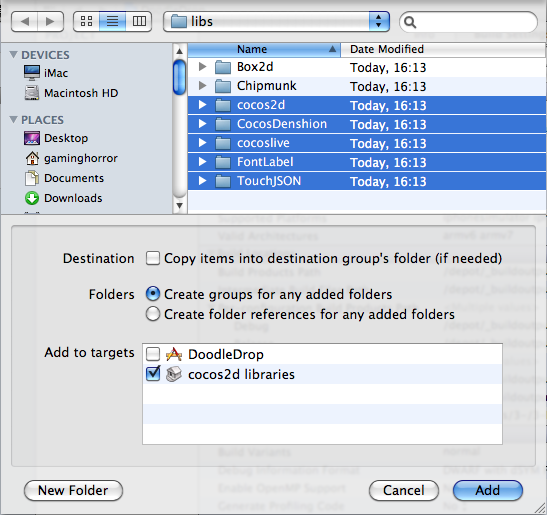
Browse into the project’s libs folder and select all the library folders that you need in your project.
You may have noticed that my project doesn’t use any physics engine, so I decided to not add them here. If you do use Box2D in your project you would want to also select Box2D of course. Likewise if you use Chipmunk.
Note: While it’s not a problem to add both physics engine folders, doing so might increase your App’s size.
Now, here’s where you need to be careful with the options! You want to make sure they’re set exactly as in the screenshot below. Most importantly, when adding files Xcode will default to add the files to the project’s main target (in this case DoodleDrop) instead of the cocos2d libraries target.
Make sure that only the cocos2d libraries target is selected to avoid any build errors:
Step #5: Build it!
You should now try and build the project. If you’re lucky, there won’t be any errors and you can continue with your work.
But most likely, depending on your project’s complexity and the changes made to cocos2d-iphone, you may have to fix any build errors that occur. Most of them are likely to be caused by classes that have been renamed or functions that have been deprecated. In this case you’ll have to find out through the API Reference and release notes what the changes are and how to fix them.
Fixing the “missing base SDK” message
One common issue that occurs specifically to older projects is the “missing base SDK” error. I think it was the Xcode version introduced with Mac OS X Snow Leopard (released Aug. 28th 2010) that eventually fixed this dreaded issue by adding a “latest iOS” option for the Base SDK Build Setting.
If you see a message like this (especially if it gives you a compile warning or error):
![]()
You should change the Base SDK Build Setting of your project to use the “Latest iOS” setting:
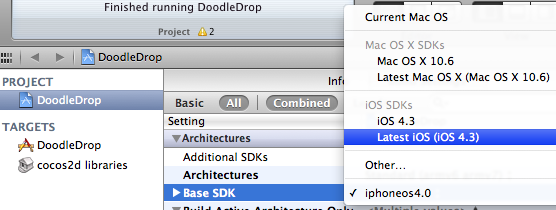
Note: In some cases it may be necessary to close Xcode 4 and re-open it to make the “missing base SDK” message go away.
Correctly Inheriting Build Settings
Normally, all targets in Xcode inherit the Build Settings of the project by default.
However, once you’ve made any change to any Build Setting at the target level this Build Setting will no longer inherit changes made to the same Build Setting on the project level. The default reaction by many developers is often to bite the bullet and check and re-check the Build Settings of the project as well as all targets, and to make the same change as many times as you have targets in your project.
Don’t do that, there’s a better and easier way!
You can have a Build Setting at the target level to default back to inherit the Build Setting defined at the project level. Likewise a Build Setting at the project level can be set to inherit from the OS default setting. In the screenshot below I have purposefully changed the Build Setting at the target level:
![]()
To have it default back to the project setting, which is Latest iOS (iOS 4.3) all you need to do is to select that Build Setting and hit the Delete key:
![]()
Tip: Switching from the Combined to the Levels view when reviewing the Build Settings makes it easy to see which Build Settings are inherited and which aren’t. You’ll also notice that any Build Setting that has been changed at the current level and doesn’t inherit its value anymore is printed in bold letters.
That’s it!
Happy coding with your newly updated cocos2d-iphone project! This upgrade tutorial will also be printed in the second revision of the Learn Cocos2D book.
Tip: With Kobold2D it will be even easier to upgrade your project because a simple copy & paste of the files in the kobold2d folder will suffice. If there are ever any additional steps to follow we’ll describe them in detail of course.
In my book I explained how to create collision shapes for physic engines using the freely available version of VertexHelper Pro. Granted, it works, but as soon as you need to update your shapes frequently or you have many different shapes to edit it’s going to be a lot of manual work and error-prone copy & paste between VertexHelper’s code generator and your source code.
VertexHelper, meet your replacement: PhysicsEditor
PhysicsEditor was written by Andreas Löw, the author of the very popular TexturePacker tool. He has proved again that he can create powerful yet easy to use tools for game developers.
The greatest part about PhysicsEditor: it can automatically trace your shapes to generate collision shapes and it works flawlessly! You can even tweak the amount of vertices (and a lot of other things) as needed, for example if your physics engine has a limitation on how many vertices can be used for a collision shape (Box2D default: 8 vertices).
But it doesn’t just create the collision shapes, it also allows you to edit physics properties of a shape that often go along with it. Density, friction, “bouncyness”, and other parameters can be tweaked in the GUI.
As they say, an image speaks louder than words, so I suppose a video speaks in a thousand images:
Not just Cocos2D
PhysicsEditor currently exports to Cocos2D + Box2D (Chipmunk/SpaceManager support is forthcoming and should be available soon) and also to Sparrow Framework + Chipmunk and of course Corona SDK.
And it works on Windows, too! Which makes sense given that Corona supports Android development under Windows.
I also found this post about PhysicsEditor with a working Flash example (at the bottom). It seems that even exporting respectively using PhysicsEditor with Flash + Box2D seems to work well. Wow!
Brace for impact!
Check out the PhysicsEditor Features page to learn more about what this great tool can do for you! You can get PhysicsEditor alone for $17.94 but you can also grab a bundle deal which includes TexturePacker for $29.99, or almost 20% off.
Continuing with yesterday’s Box2D Car demo I’d like to stay on the topic of Box2D and present to you the Tilemap based Box2D world put together by theTconcept, a website hosted by a group of italian and mexican designers, writers and coders.
In their tutorial they explain how to create Box2D collisions from a Tiled Map Editor world, by using the object group layer. The one you can use to place arbitrary rectangles on in Tiled. The resulting Xcode project is available for download.
Chapter 14 - Game Center
This chapter will revolve all around Apple’s Game Center technology. Especially peer to peer networking is very interesting. The idea is to create a small multiplayer room using the Isometric game built in Chapter 11.
I actually had to buy a new iPod Touch 4 to be able to test all the new features. I was blissfully unaware that the more exciting features aren’t available on my iPhone 3G. Darn, technology moves so fast.
Summary of working on Chapter 13 - Pinball Game
I think it’s an amazing game, and I’m happy that several commenters, Twitterers and people I know in real life (you know, those you can actually touch while you’re talking to them) mentioned a pinball game as a possible example. Come to think of it, a pinball game is just great! It’s almost a sandbox that you can add more stuff to it and experiment. And it allowed me to use VertexHelper, which I haven’t been able to mention in the previous chapter.
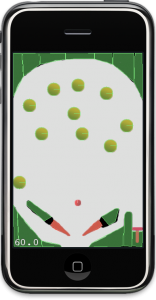 Also, I’m a big pinball fan. Well, I used to be a computer pinball game crack. Have I ever mentioned that I was a beta tester for Balls of Steels, the pinball game from Apogee/3D Realms? When the shareware table was officially released, the highscore I achieved held the #1 spot for roughly 6 months in the worldwide leaderboard. And I basically stopped playing this game session after about 12 consecutive hours, just because I didn’t see the end of it. I always had the extra balls maxed out and I was still on my first ball. I just got bored.
Anyhow, it was great fun to actually build a pinball table myself. I can now appreciate more than ever how complex it is to create these beasts, be it for real or as a computer simulation. My respect to all game developers who ever built a pinball game, most importantly: the developers of the Pinball Dreams/Fantasies/Illusions series created by DICE, the developer of Epic Pinball James Schmalz and of course the creators of the Balls of Steel game Wildfire Studios.
Of course, when you read this chapter you’ll learn more about the prismatic and revolute joints of Box2d as well as joint limits and motors, among many other things. I’m also excited to see some of the readers turn this baby into a really good pinball game. I admit, this version, it don’t look too good. But as it is, it’s fully functional and incredibly cool for the short time frame I had to develop it in.
Chapter 13 - Physics Game
After the introduction of the physics engines Box2d and Chipmunk, this chapter will focus on one physics engine in greater depth by making a physics game using Box2d.
What kind of game? If you have an idea real quick let me know, because I haven’t decided yet. I was thinking about a space game with gravity but also a bit like Pinball, or more like a Sandbox game with some optional goals. Or something else entirely. The only caveat is: it has to be do-able in less than a week while also writing the chapter and I should be able to illustrate some details about the physics engine! That’s no mean feat.
Summary of working on Chapter 12 - Physics Engines
I basically split this chapter in half and gave each of the two physics engines, Box2d and Chipmunk, a good treatment. Initially I started with the templates provided by cocos2d, just to get all the code together and not having to talk about setting up the Xcode project. I quickly realized that the application templates are inadequate, erroneous and outdated, probably because they have barely been maintained as both Box2d and Chipmunk matured. They seriously need a refresher, and I was thinking that maybe I’ll turn the two projects for this chapter into cocos2d application templates for physics engines, replacing the current ones and using my Xcode template project, so that I don’t need to go in and change them every time cocos2d gets an update.
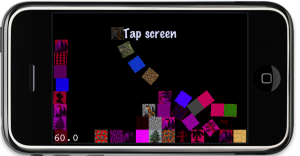 Anyway, both physics engines got their treatment and I built the same project for both. So now you can actually compare them, side-by-side, be it performance or behavior or just plain coding style or number of lines.
Unfortunately, there’s a lot to talk about even for just doing the basics. I got both projects to the point of adding more boxes to the world, then adding rudimentary collision detection and a simple joint example with 4 bodies strung together. There wasn’t enough space for more. But I did foresee it which is why I planned in the Physics Game chapter as a follow-up. Let me know real quick if you have an idea for a simple physics game, or send me a link to an existing game on the App Store. Ideally within the next 24 hours.
My Opinion
I once again realized why some developers may be preferring Chipmunk because it is more “direct” and easier to pickup, as in you just add a new callback method and that’s that. I can see that but it’s very misleading. Chipmunk is making me cry by throwing all those one-letter e, u, i, f, m, p, etc. fields at me, so I’ll have to remember that u is for friction, for example. I’m not a machine! And because you can’t hide private fields in C those are exposed as well, adding to the confusion. I found myself having to look up a lot of things frequently in the Chipmunk manual. The bad thing is, it’s a manual, and not an API reference - but I keep having to use it like it were an API reference by using search a lot. Box2d provided a much cleaner API and both a manual and an API reference, which made it a lot less painful to figure things out, to look things up.
People’s arguments about which physics engine is better often runs along the lines of language, features, performance, memory footprint and what not. But if I have to choose, I’d say both are fairly complete and mature physics engines, so for me the choice is really about API design and documentation. And in that area, Box2d is the clear winner in my book. Of course, I kept a neutral tone writing the book, I don’t want to bias anyone because at the end of the day, the important thing is that you can make a great game with both engines, and not everyone is familiar with C++ and that’s a very daunting language to learn.


