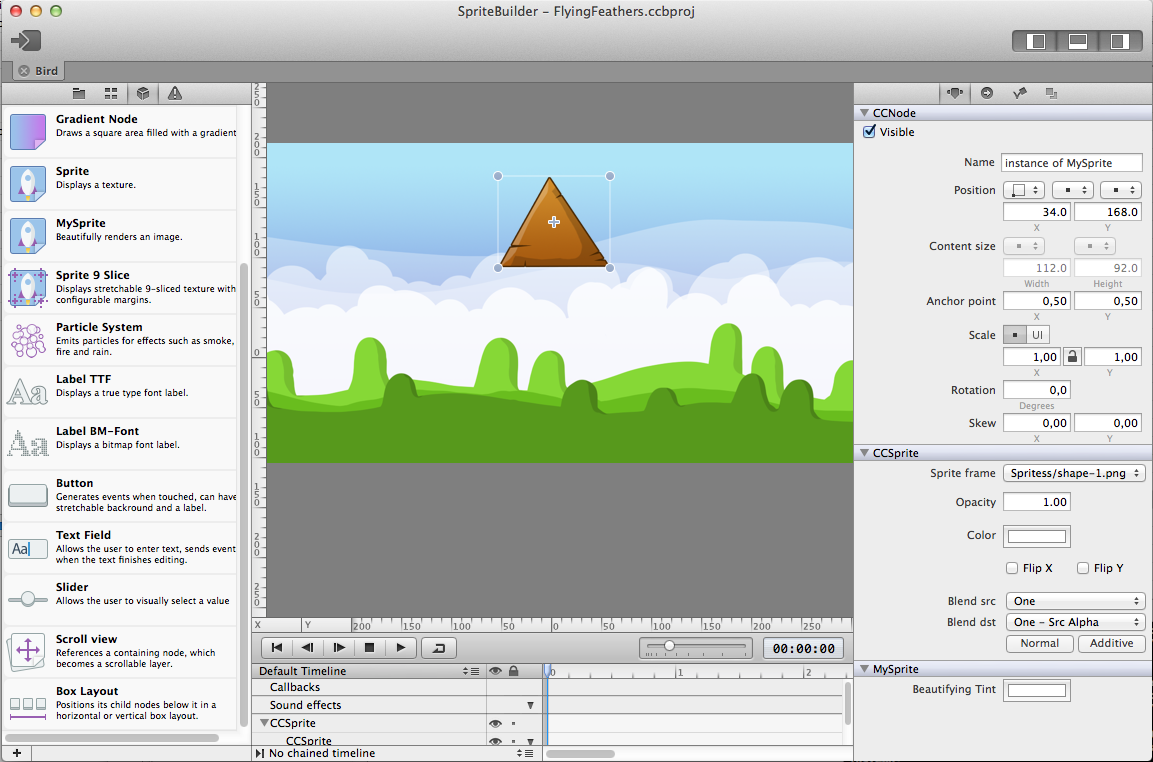
Custom-built SpriteBuilder with MySprite node plugin
Following the recent release of SpriteBuilder and cocos2d-iphone v3 I’m sure some of you are itching to use SpriteBuilder by building the github version in Xcode rather than downloading it from the Mac App Store. Here’s how!
This is a post for developers who want to compile the SpriteBuilder code from github. To customize it, to debug issues, to add or gain access to new features; be it for their own use or to help the project, or both.
Previous experience with Xcode, Objective-C, cocos2d-iphone, git and github is assumed.
Download SpriteBuilder from github
The download and first-time compilation procedure is also detailed on the SpriteBuilder github page. You need to clone the project, then initialize the cocos2d-iphone submodule. The necessary Terminal commands are as follows:
|
1 2 3 |
git clone https://github.com/apportable/SpriteBuilder cd SpriteBuilder git submodule update --init --recursive |
Cloning and initializing the cocos2d-iphone submodule may take a while since it will download over 300 MB altogether.
Note: if you created a fork of SpriteBuilder the git clone command should use your fork’s URL and not the one show above, so that you will be able to push changes to your repository and later send pull requests to the Apportable/SpriteBuilder repository.
If you want to work with the bleeding edge version you may want to switch to the develop branch:
|
1 |
git checkout develop |
Pros of using the develop branch: some known bugs may be fixed, new features may be available.
Cons of using the develop branch: untamed bugs may be lurking in the source woods, waiting for just the right moment to prey on your sanity. New features may be incomplete, work in progress code may lead to loss of data, nerves, weekends. Consider yourself adequately warned.
Building SpriteBuilder for the first time
Before you can build SpriteBuilder from within Xcode you must run the BuildDistribution.sh script at least once. The script needs to be run from the scripts subfolder and it takes a parameter indicating the version number used to create CCB(i) files:
|
1 2 |
cd scripts ./BuildDistribution.sh 1.x |
This may take a few minutes to complete. Verify that one of the last couple lines reads: ** BUILD SUCCEEDED **.
If it doesn’t or it says BUILD FAILED then check the above steps, make sure you also initialized the cocos2d submodule (and wait for it to complete) and that you ran the BuildDistribution script in the scripts folder and supplied the 1.x parameter. If you still get the error, post the last couple lines surrounding the BUILD FAILED message to the SpriteBuilder forum, explaining your situation.
Build & Run SpriteBuilder within Xcode
You can now open the SpriteBuilder.xcodeproj in the SpriteBuilder subfolder. Check the scheme selection list in the upper left area of Xcode, next to the Run/Stop buttons, or by going to the Product -> Scheme menu. Make sure the SpriteBuilder scheme is selected. Press the Run button, and open an existing or create a new project file.
Tip: the SpriteBuilder scheme may sometimes be set to build the Release Build Configuration. This will make it difficult to debug the running app. Select Product -> Scheme -> Edit Scheme and verify that Build Configuration is set to Debug.
You’re now ready to customize SpriteBuilder. It’s a huge project so take it slowly, try making smaller changes at first, or try to locate and fix a smaller bug or usability issue.
Adding a Custom Node Plugin
Within the SpriteBuilder Xcode project you’ll find a group named Plugins (Nodes). It contains code for all node classes that can be dragged from the Node Library onto a CCB scene. Each so-called plugin is built by its own target.
Here’s the step-by-step procedure to create a new node plugin based off of the CCSprite plugin. The new plugin we’ll call MySprite but you can give it any name you like.
Duplicate and Rename an existing Node Plugin
You’ll notice that you’ll mainly be renaming a lot of files and settings to your new plugin’s name, so double-check that you don’t introduce a subtle typo (including upper/lowercase differences).
- Select the SpriteBuilder project itself (topmost entry in the Project Navigator) to bring up the project pane that has a list of all targets in the project.
- Select the CCSprite target and right-click it, select Duplicate. This will add another target named “CCSprite copy”. Rename the target and its scheme to MySprite.
- Switch to the Build Phases pane of the duplicated target. Remove all entries in both the Compile Sources and the Copy Bundle Resources lists.
- Switch to the Build Settings pane of the duplicated target. You need to change the following settings (don’t actually type [blank], leave the field blank):
- Product Name => MySprite
- Prefix Header => [blank]
- Info.plist File => [blank]
- In Finder, locate the CCSprite folder inside the SpriteBuilder folder. Duplicate the folder (Select folder, Cmd+C, Cmd+V) and rename the folder to MySprite.
- In Xcode, use File -> Add Files to “SpriteBuilder” and select the MySprite folder. Verify the dialog settings are correct:
- Make sure the “Copy Items …” checkbox is not checked.
- The Folders setting is set to “Create groups …”.
- Uncheck all “Add to targets” checkboxes except the one that reads MySprite. Note: it may still read CCSprite copy, in that case use that.
- (optional) In the newly added group you may find the files CCSprite-Info.plist and CCSprite-Prefix.pch. You can move them to the trash. At the bottom of the Project Navigator you may also find a CCSprite copy-Info.plist item, you can trash that as well.
- Open the CCBPSprite.h header file, right-click on the CCBPSprite class name and select Refactor => Rename. Enter MySprite as new class name and accept the suggested changes. This will also rename the class’ files to MySprite.h / MySprite.m.
If you select the MySprite scheme and hit run. This should compile the new plugin without any errors. If you have confirmed that it compiles, select the scheme back to SpriteBuilder so you can launch SpriteBuilder next time (plugin schemes only compile, they will not “run” and won’t launch SpriteBuilder).
Linking the new Node Plugin with SpriteBuilder
There are additional steps to link the plugin with SpriteBuilder. More precisely building SpriteBuilder should also build the plugin target and copy its output to the SpriteBuilder plugins folder. This is done with the following steps.
- Select the SpriteBuilder project in the Project Navigator pane to bring up the list of targets.
- Select the SpriteBuilder target and switch to its Build Phases pane.
- Under Target Dependencies click the + button and select the MySprite target and add it to the list.
- Under the Copy Plugins phase click the + button and add the MySprite.ccbPlugNode file. This file is located in the Products group which you can find by scrolling down to the very bottom of the list.
When you build and run SpriteBuilder, and create a new project and switch to the Node Library tab, you’ll find two nodes with identical names and description. Don’t use them yet as having two identical sets of plugins will confuse SpriteBuilder and CCBReader.
Making the new Node Plugin unique
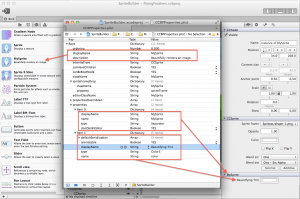
Plugin Properties Explained
In Xcode, go to the MySprite group and select the CCBPProperties.plist file. This file contains all information needed to customize your node plugin.
You should change all occurences of the original node plugin’s name (here: CCSprite) to the new name: MySprite. At the least you will have to update className and editorClassName. Also check any NSArray / NSDictionary collections and their items.
You should also edit the displayName and description strings for the plugin node. This is the name and description the node goes by in the Node Library View.
You should also specify the super class by changing the inheritsFrom entry, unless the node directly subclasses CCNode.
If you build and run, you can drag and drop your new node onto scenes and start using it. Its properties will be exported and the CCBReader should create an instance of that class, provided the game project also contains the source files of your custom node class.
Conclusion, Further Reading
The focus in this guide was to make your node plugin unique and technically correct, so that it can be saved to the CCB(i) format and read by CCBReader.
You can find a description of the CCBPProperties settings in the SpriteBuilder project under the Resources/Documentation group in a file named Creating Node Plug-ins.md or similar. Eventually this information will be made more easily accessible, ie in the online help document and/or the SpriteBuilder wiki.
| Follow @gaminghorror | Follow @kobold2d |
|