


I’m really happy and excited that YETIPIPI was released today in the iOS App Store! 
UPDATE: currently only available in german App Store due to delayed english localization.
Go grab it for $.99 (€.89) try it out and give it it’s (hopefully) deserved 5-Star review.
What’s the game about?
YETIPIPI was a contract project in collaboration with Doubleplus Digital Media Entertainment for Joscha Sauer. Joscha is one of germany’s most popular cartoonists and the mastermind behind the Nichtlustig cartoons (some of his cartoons are also available in english).
The game is inspired by one particularly famous comic strip, where a Yeti pees in a circle, leaving him (or in this case both) stranded in an unfortunate situation.

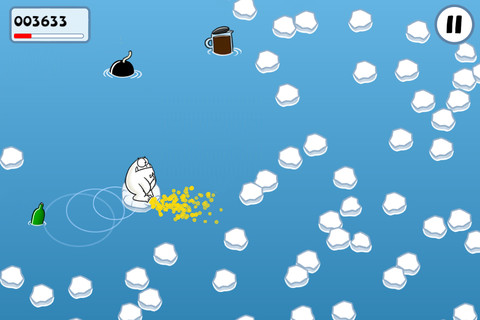
To survive, our Yeti must drink so he can pee the ice floes floating about in ever smaller pieces. You control the Yeti with the accelerometer to collect items, evade ice floes and to aim your stream of urine.
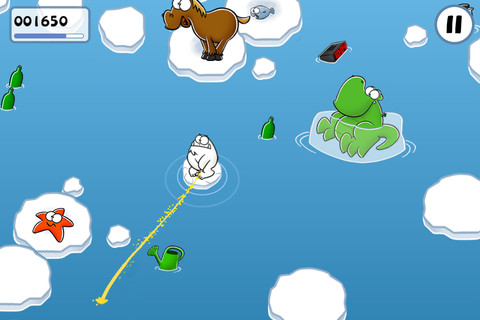
Try to stay afloat for as long as possible! This is one of the situations you should try to avoid getting into:
But if you manage to survive this ordeal, there’ll be achievements waiting to be unlocked!

And one of the nicest things is the less than average highscore entry. You don’t type text, you pee your name in the snow!

Technology Postmortem
The game was created with Kobold2D and cocos2d-iphone v1.0. A lot of time was spent to tweak the animation and behavior of the urine stream. If anyone asked me what I’ve been working on these days, I’d sometimes jokingly answer: “Pee.”
The stream itself is a series of line segments derived from connecting the positions of Box2D bodies, which are shot like bullets in the direction the player is facing and also determine whether the stream hit something. The stream lines varies in thickness and the entire polygon is further smoothed using the Catmull Rom algorithm, removing all “edges”. A particle effect is drawn over the pee stream to add random splatters of pee, to make it more lively. A small amount of autoaim with the help of Box2D’s raycasting callbacks helps to make the game easier to play.
Peeing being so central to the game, it was definitely the feature we spent the most time working on, optimizing the look and feel and visuals and behavior. Looking back it’s amazing how crude the pee stream was in initial versions. It pays off to invest the time to make your core feature work really well, and if it also looks nice - even better!
Accelerometer input is not just low-pass filtered, but easing is also applied. This helps in two situations: non-linear acceleration and deceleration based on how much you tilt the device, and being able to turn without moving (much) when tilting the device gently. This is important because you need to be able to stand in place and turn around as well as moving away quickly, both controlled by tilting the device. After the pee stream this was the second largest time sink and went through several iterations.
Ingame rendering of game objects is done with depth buffer enabled. This was necessary for the pseudo-isometric point of view. The OpenGL vertexZ value is adjusted every frame for each game object according to their y coordinate. That way objects that appear closer to the viewer (lower y coordinate) will always be drawn over objects that appear farther away (higher y coordinate). This approach is faster than using the reorderChild:z: method of cocos2d, because that rearranges the items in the children array. It does make alpha blending a bit more complicated though, because cocos2d always assumes nodes to be drawn in the order they appear in the children array.
Drawing your name with pee when you achieve a highscore was created with a CCRenderTexture without clearing it every frame. An array of touch input coordinates is stored, and subdivided to make sure there are no large jumps between coordinates. A pee “blurb” sprite is drawn with low opacity each frame for a given number of times for each point so that almost full opacity is obtained after a second or two, for each point in the drawn stream. You can draw faster to make thinner lines but there won’t be any real gaps in the stream. The image is then saved to the documents folder as PNG and displayed in the highscore list (but not uploaded to Game Center).
There are a total of four CCScene scenes in the game: intro, main menu, loading and game. All menu screen transitions actually happen in the same scene without switching scenes. This was important because the “clown menu” was to be a common interface in all screens, and transition needed to be seemless. So whenever an actual scene change does occur, the clown menu object is removed from the current scene and added to the next to keep it alive and in the same state.
The clown menu itself is a CCNode with children depending on what content should be displayed. It was designed to be reusable for future games, but also to retain its state when changing scenes. Each line of clown menu buttons is added to a group and groups can be animated into view by name. The clown menu then requests a “background node” for a particular group by calling a delegate method. That method then adds all the background images and animations as they should appear on screen to the given background node.
The rotating part of the clown menu (the buttons) use a rotation center node as their parent which is offset somewhere below the screen, centered horizontally, and rotated by 90 degrees either to the left or right. The “rolling in” animation of the buttons is then simply a CCRotateTo action on the rotation center node, whereas the background node simply leaves respectively enters the screen to/from the right or left. After each rotation animation sequence completed the delegate gets notified to perform additional cleanup steps. Each button also performs an additional “wiggle” action sequence applied when rolling ended.
The achievements and highscore screens use a UIScrollView to achieve the “bouncy” feel you know well from many UIKit views. Integrating UIScrollView in cocos2d however is tricky. I ended up having to change CCDirector’s update method to add a locking semaphore, in order to allow enough time for UIScrollView yet enabling cocos2d to update its view as well. Using a flag this custom drawing code is only applied in screens where a UIScrollView is used. I wanted to avoid any side-effects or performance issues during gameplay. The common recommendation to lower the CCDirector animation interval did not work, it still makes UIScrollView not as responsive and “jumpy” at times.
The intro scene features a full-motion video after the clown menu first appeared. You’ll notice the clown menu with the “skip” button remains overlaid over the video. This is done with a trick: I created a screenshot of just the clown menu with the skip button, turned it into an image, and added it to the video player view as a UIImageView subview. So it’s actually a separate image because you can’t draw cocos2d nodes over a UIKit view (at least not without sacrificing performance and memory). And to make the skip button clickable I only needed to forward the touch events to the self.nextResponder - which is cocos2d’s CCGLView - so that the clown menu will still register a tap at the location of the button.
All texture atlases in the game are .pvr.ccz images created with TexturePacker. They load exceptionally fast, they’re NPOT sized and some are color reduced to 16-Bit with dithering to reduce memory usage. You can learn more about the optimizations I did in my blog post about memory optimization. Overall memory usage is less than 90 MB on a Retina device, this includes fully buffered background music.
For music and audio I used ObjectAL because I found its API is easier to pick up than CocosDenshion, and it provided more features. To enable Doubleplus to tweak gameplay parameters I created several Lua data files where game objects read their parameters from. Both ObjetAL and Lua data files are built-in features of Kobold2D.
| Follow @gaminghorror | Follow @kobold2d |
|


[…] The game I coded is finally out: YETIPIPI […]
Awesome paint work, must of took some time.
[…] If you’re interested to learn more about the technical details of this game, check out the YETIPIPI postmortem. […]